
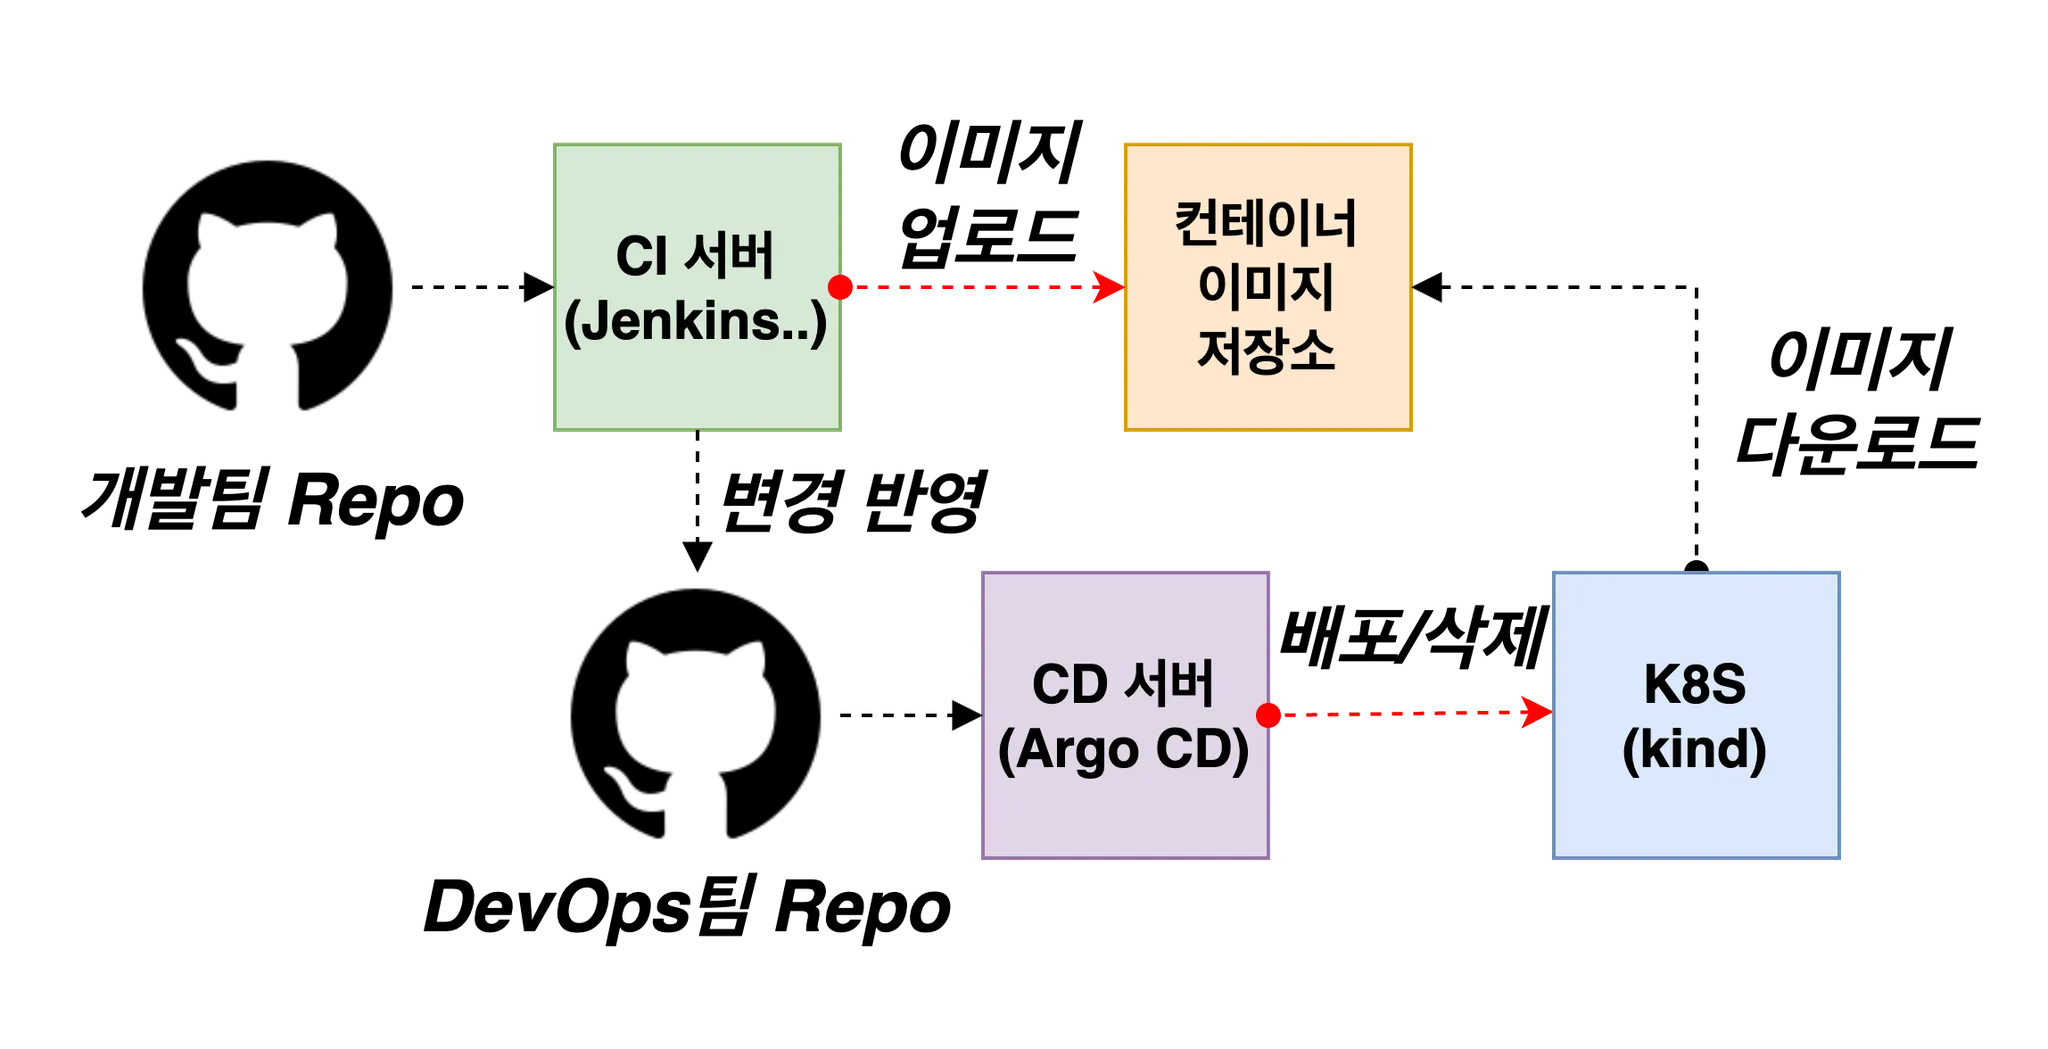
목표 구성도

실습 환경
- 인프라 : 로컬 PC
- 클러스터 : kind Cluster
- SW : Jenkins, Gogs, kind(k8s)
Jenkins, gogs 컨테이너 배포 (docker-compose)
## 작업 디릭토리 생성
mkdir cicd-labs
cd cicd-labs

## Jenkins, Gogs 배포
cat <<EOT > docker-compose.yaml
services:

  jenkins:
    container_name: jenkins
    image: jenkins/jenkins
    restart: unless-stopped
    networks:
      - cicd-network
    ports:
      - "8080:8080"
      - "50000:50000"
    volumes:
      - /var/run/docker.sock:/var/run/docker.sock
      - jenkins_home:/var/jenkins_home

  gogs:
    container_name: gogs
    image: gogs/gogs
    restart: unless-stopped
    networks:
      - cicd-network
    ports:
      - "10022:22"
      - "3000:3000"
    volumes:
      - gogs-data:/data

volumes:
  jenkins_home:
  gogs-data:

networks:
  cicd-network:
    driver: bridge
EOT

docker compose up -d
docker compose ps

## 기본 정보 확인
for i in gogs jenkins ; do echo ">> container : $i <<"; docker compose exec $i sh -c "whoami && pwd"; echo; done

## 도커를 이용하여 각 컨테이너로 접속
docker compose exec jenkins bash
docker compose exec gogs bash
Jenkins 컨테이너 초기 설정
## Jenkins 초기 암호 확인
docker compose exec jenkins cat /var/jenkins_home/secrets/initialAdminPassword

## Jekins 웹 접속 주소 확인 admin / qwe123
open "http://127.0.0.1:8080"

## 로그 확인
docker compose logs jenkins -f
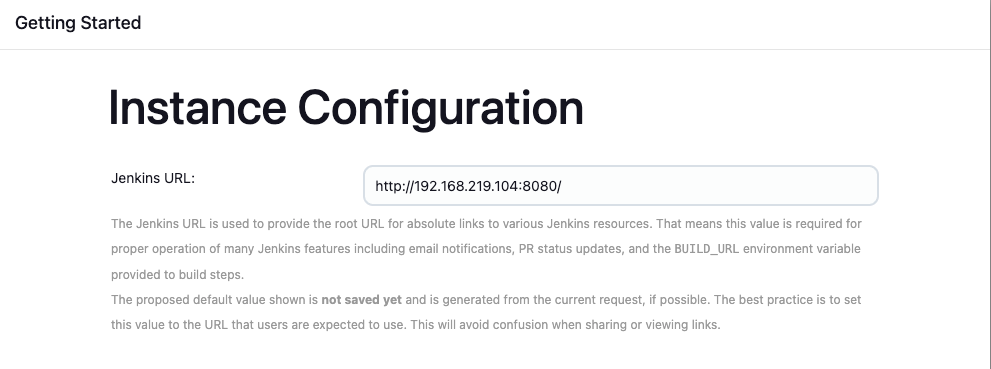
- Jenkins URL 설정
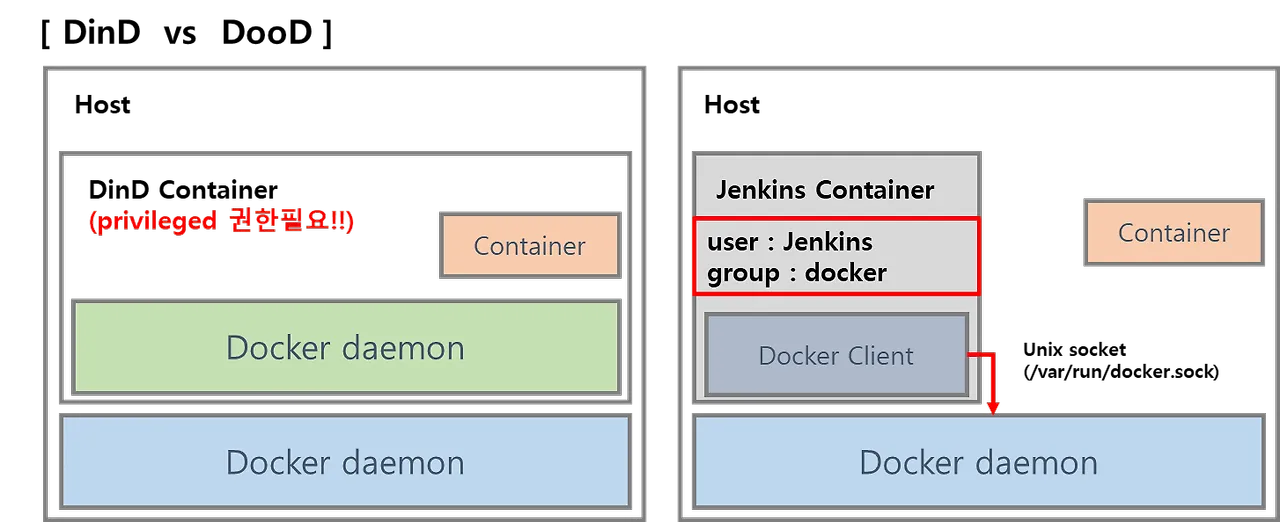
- Jenkins 컨테이너에서 호스트 도커 데몬 사용 설정 (Docker out of Docker) - Jenkins 컨테이너 내부에서 로컬 PC의 Docker 사용
## Jenkins 컨테이너 내부에 도커 실행 파일 설치
docker compose exec --privileged -u root jenkins bash

root@42b97c5684fd:/# id
uid=0(root) gid=0(root) groups=0(root)

## jenkins 컨테이너 내부에서 root가 아닌 jenkins 유저도 docker를 실행할 수 있도록 권한을 부여
groupadd -g 2000 -f docker

chgrp docker /var/run/docker.sock
ls -l /var/run/docker.sock
usermod -aG docker jenkins
cat /etc/group | grep docker

exit

## 변경된 권한 적용을 위해 컨테이너 재실행
docker compose restart jenkins

## jenkins user로 docker 명령어 실행 확인
docker compose exec jenkins id
docker compose exec jenkins docker info
docker compose exec jenkins docker ps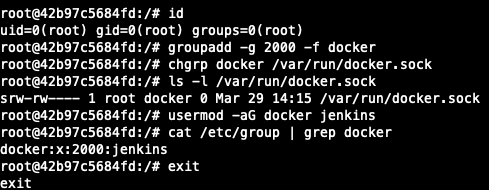
gogs 컨테이너 초기 실행
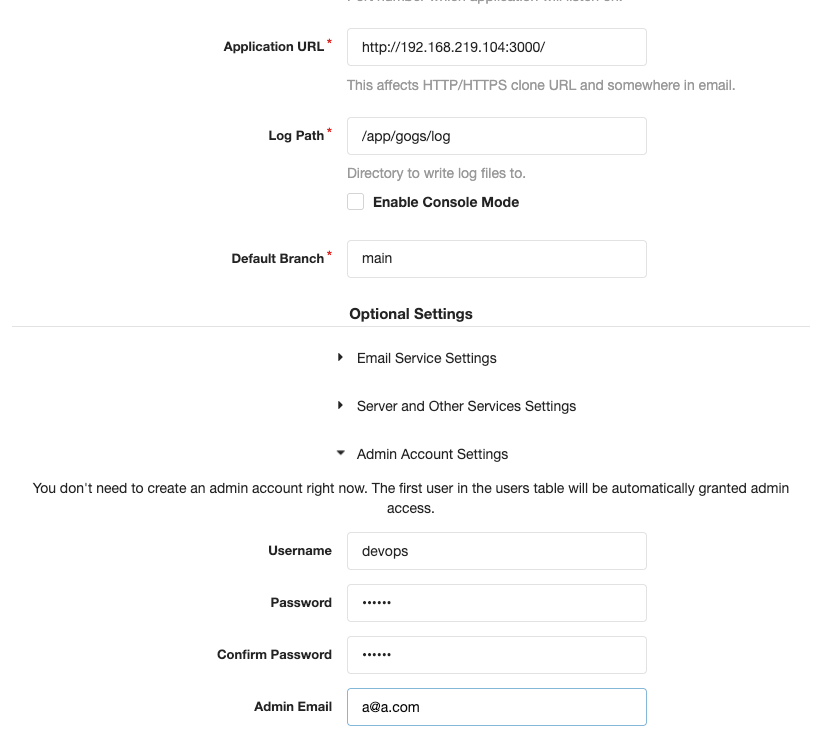
- 웹 페이지 접속 : http://127.0.0.1:3000/install
초기 설정 진행
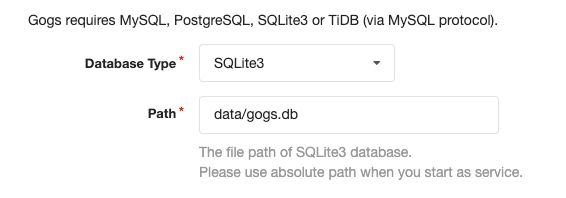
- 데이터베이스 유형 : SQLite3
- 어플리케이션 URl : http://<로컬 PC IP>:3000/
- 기본 브랜치 : main
- 관리자 계정 설정 클릭 : 이름(계정명 - 닉네임 사용 devops), 비밀번호(qwe123)
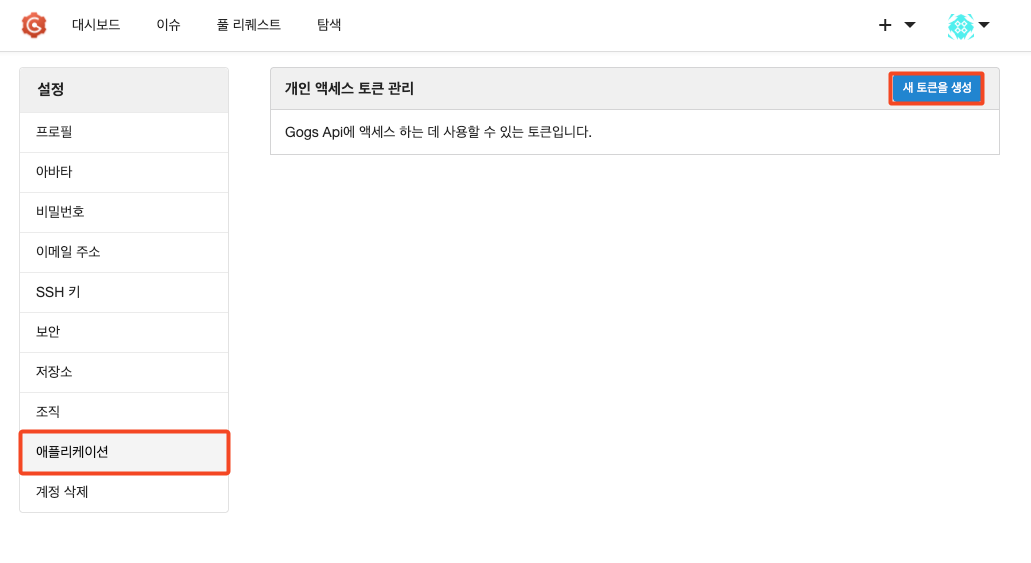
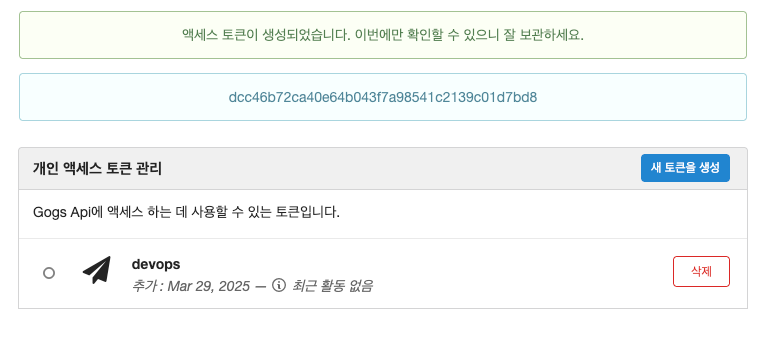
- [Token 생성] 로그인 > your settings > applications : generate new token - token name(devops) => generate token 클릭 : 메모하기
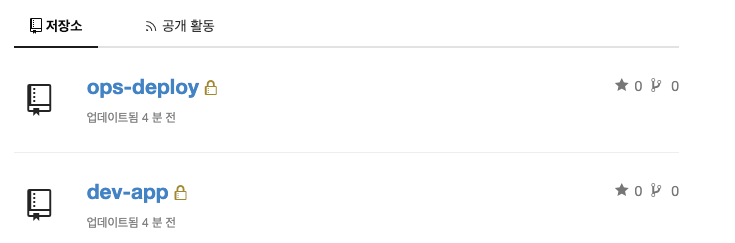
- repo 생성
- repo-1 : 개발팀 용
- repo name : dev-app
- visibility : (check) this repository is private
- .gitignore : Python
- Readme : Default
- repo-2 : 데브옵스팀 용
- repo. name : ops-deploy
- visibility : (check) this repository is private
- .gitignore : Python
- Readme : Default
- repo-1 : 개발팀 용
gogs 실습을 위한 저장소 설정
## 현재 설정 저장소 리스트 확인
git config --list --show-origin

## 환경 변수 설정
TOKEN=<gogs token>
MyIP=<Local PC IP>

## dev-app 레포 clone
git clone http://devops:$TOKEN@$MyIP:3000/devops/dev-app.git

cd dev-app
git --no-pager config --local --list
git config --local user.name "devops"
git config --local user.email "a@a.com"
git config --local init.defaultBranch main
git config --local credential.helper store
git --no-pager config --local --list
cat .git/config

#
git --no-pager branch
git remote -v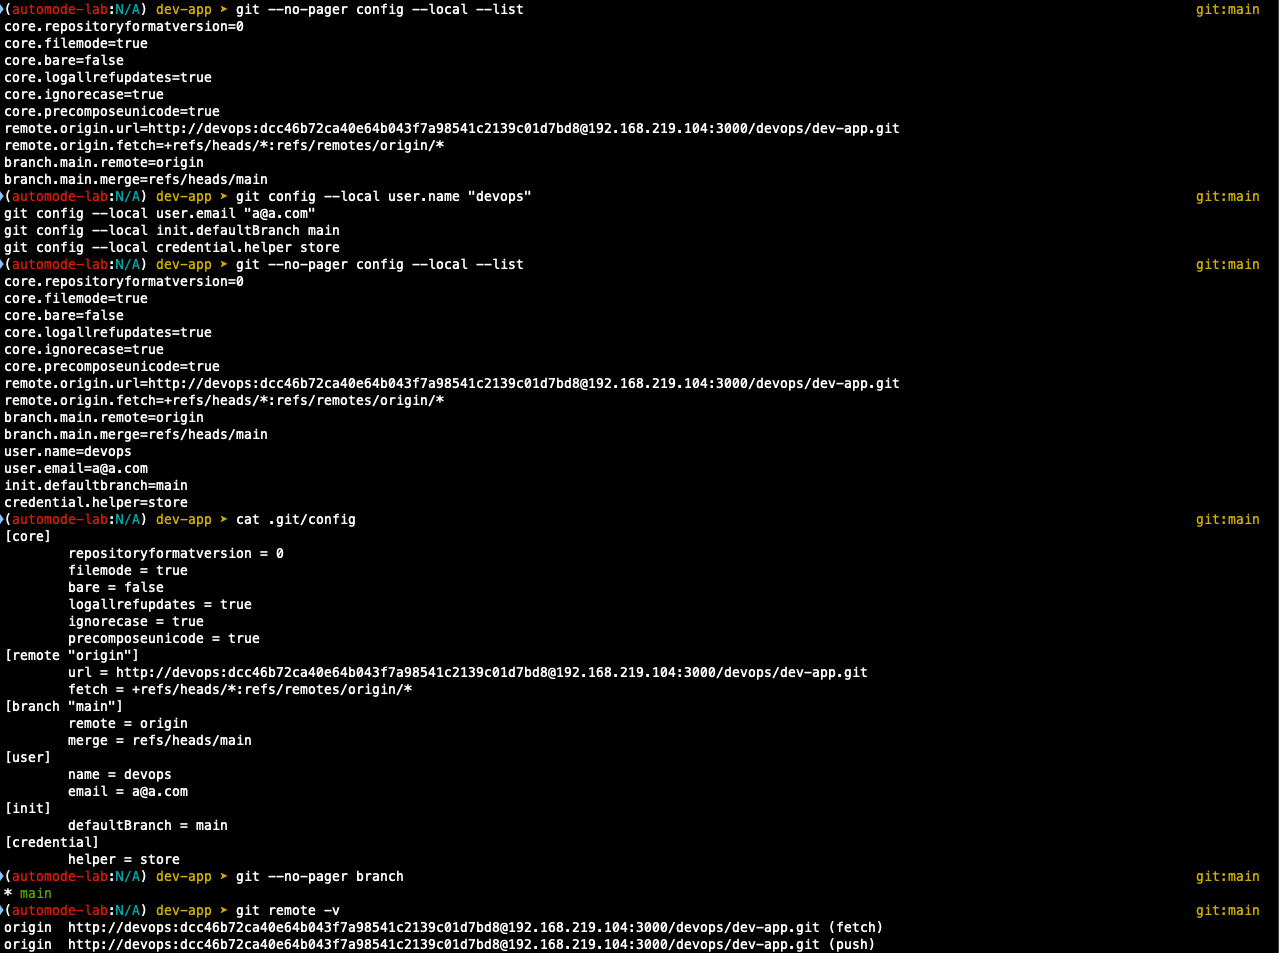
- server.py 파일 작성
cat > server.py <<EOF
from http.server import ThreadingHTTPServer, BaseHTTPRequestHandler
from datetime import datetime
import socket
class RequestHandler(BaseHTTPRequestHandler):
def do_GET(self):
match self.path:
case '/':
now = datetime.now()
hostname = socket.gethostname()
response_string = now.strftime("The time is %-I:%M:%S %p, VERSION 0.0.1\n")
response_string += f"Server hostname: {hostname}\n"
self.respond_with(200, response_string)
case '/healthz':
self.respond_with(200, "Healthy")
case _:
self.respond_with(404, "Not Found")
def respond_with(self, status_code: int, content: str) -> None:
self.send_response(status_code)
self.send_header('Content-type', 'text/plain')
self.end_headers()
self.wfile.write(bytes(content, "utf-8"))
def startServer():
try:
server = ThreadingHTTPServer(('', 80), RequestHandler)
print("Listening on " + ":".join(map(str, server.server_address)))
server.serve_forever()
except KeyboardInterrupt:
server.shutdown()
if __name__== "__main__":
startServer()
EOF
## 실행 테스트
python3 server.py
curl localhost
curl localhost/healthz
## Dockerfile 생성
cat > Dockerfile <<EOF
FROM python:3.12
ENV PYTHONUNBUFFEREED 1
COPY . /app
WORKDIR /app
CMD python3 server.py
EOF
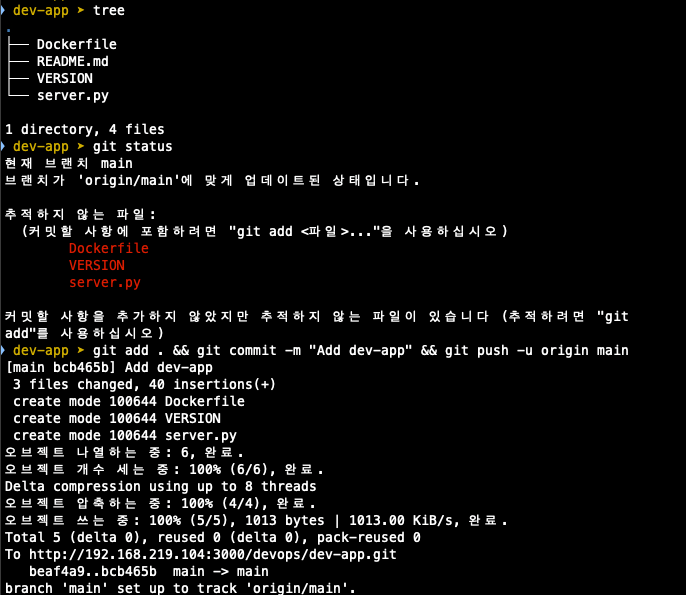
## Version 파일 생성
echo "0.0.1" > VERSION
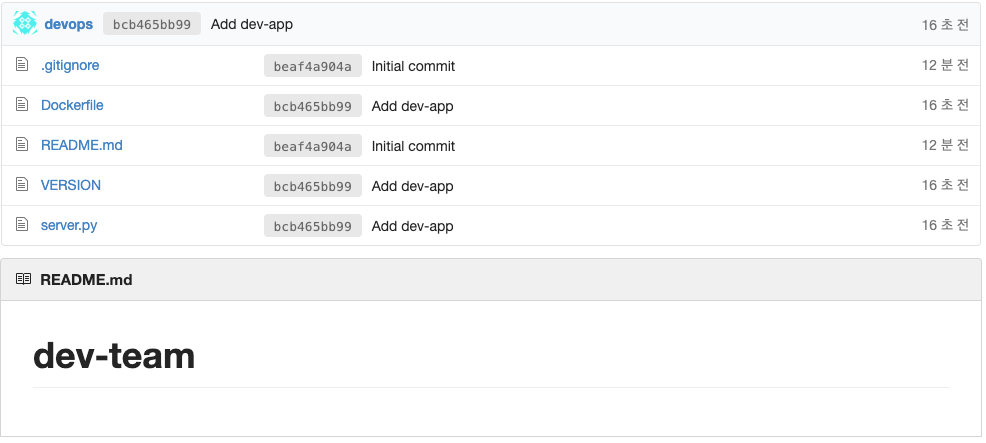
## 레포 배포
git status
git add .
git commit -m "add dev-app"
git push -u origin main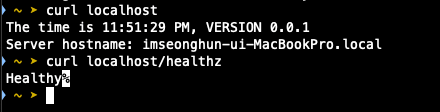
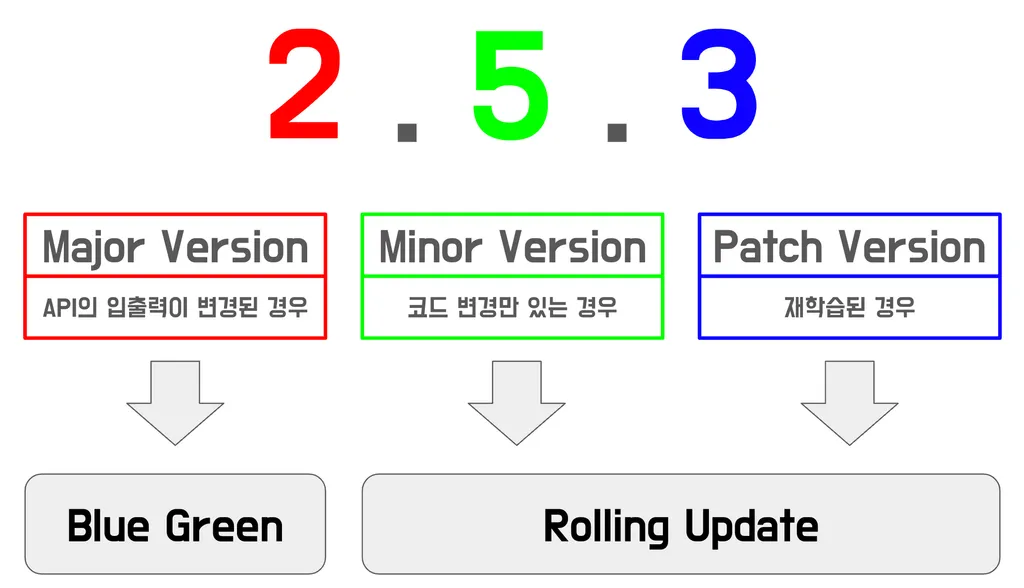
- App Version 예시
- Docker hub repo 생성 및 토큰 발급
Jenkins CI + K8S (Kind)
- kind 및 툴 설치
## kind 설치
brew install kind
kind --version

## install kubectl
brew install kubernetes-cli
k version --client=true

## 단축키 설정
echo "alias kubectl=kubecolor" >> ~/.zshrc

## Install Helm
brew install helm
helm version

## 유용한 툴 설치
brew install krew
brew install kube-ps1
brew install kubectx

## kubectl 출력 시 하이라이트
brew install kubecolor
echo "alias kubectl=kubecolor" >> ~/.zshrc
echo "compdef kubecolor=kubectl" >> ~/.zshrc
k krew install install neat stren
- Cluster 배포
## Docker 컨테이너 확인
docker ps
## cicd-labs 경로에서 파일 생성
cat > kind-3node.yaml <<EOF
kind: Cluster
apiVersion: kind.x-k8s.io/v1alpha4
networking:
apiServerAddress: "$MyIP"
nodes:
- role: control-plane
extraPortMappings:
- containerPort: 30000
hostPort: 30000
- containerPort: 30001
hostPort: 30001
- containerPort: 30002
hostPort: 30002
- containerPort: 30003
hostPort: 30003
- role: worker
- role: worker
EOF
## cluster 생성
kind create cluster --config kind-3node.yaml --name myk8s --image kindest/node:v1.32.2
## 확인
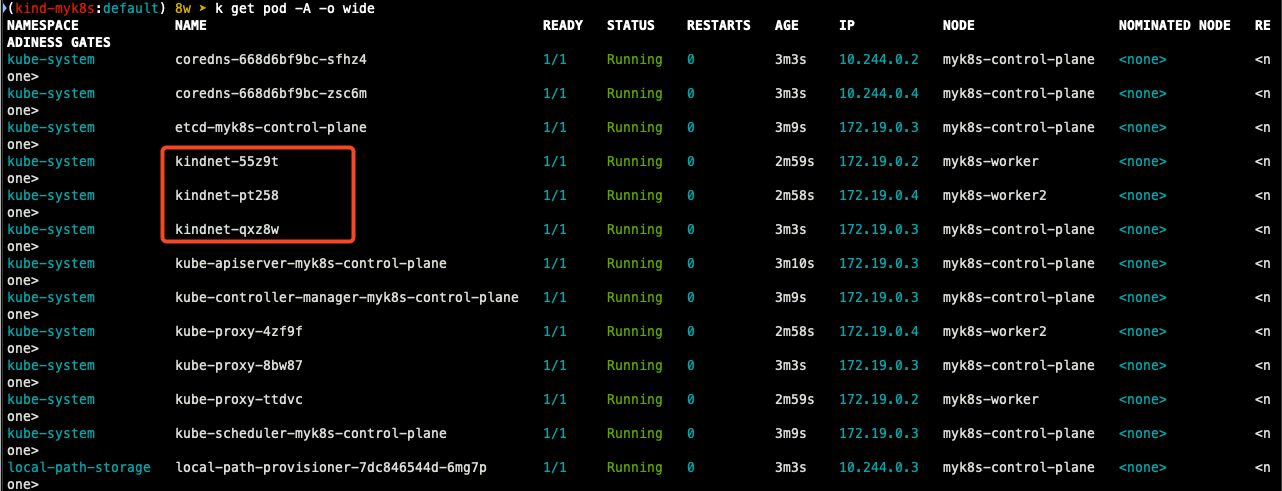
kind get nodes --name myk8s
kubens default
## kind 는 별도 도커 네트워크 생성 후 사용
docker network ls
docker inspect kind | jq
## k8s api 주소 확ㄷ인
k cluster-info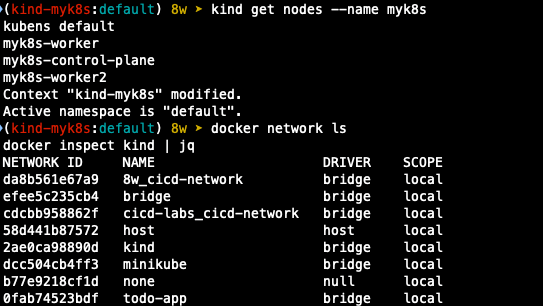
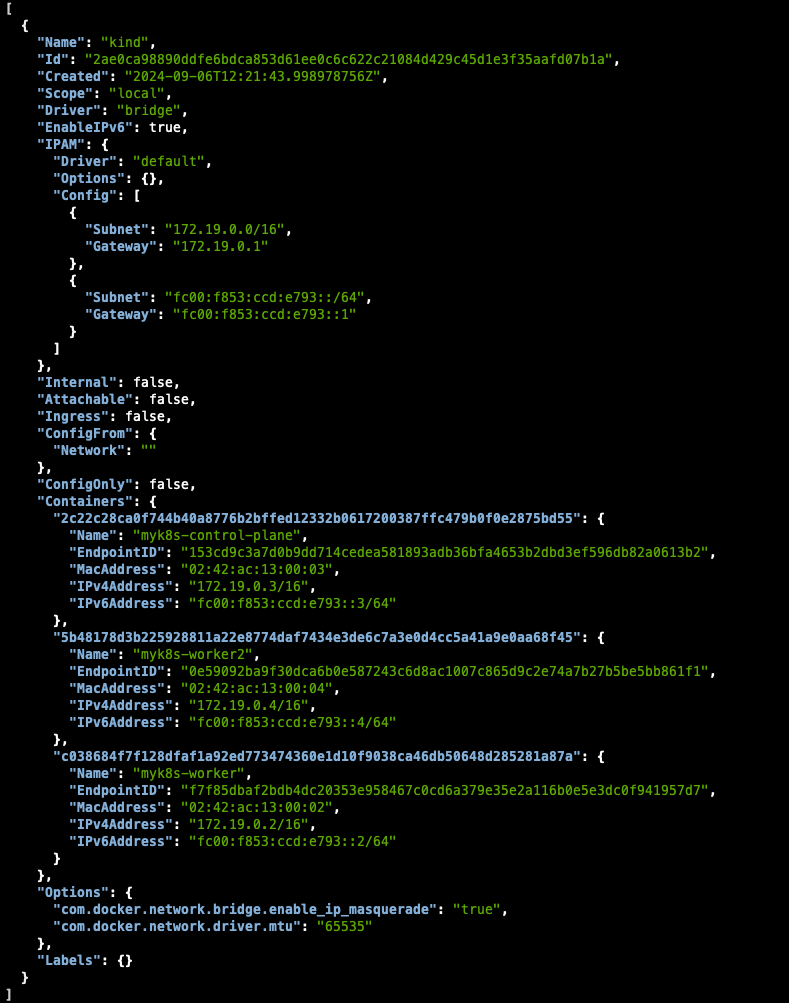
(kind는 자체 cni인 kindnet을 사용함)
- kube-ops-view 설치
helm repo add geek-cookbook https://geek-cookbook.github.io/charts/
helm install kube-ops-view geek-cookbook/kube-ops-view --version 1.2.2 --set service.main.type=NodePort,service.main.ports.http.nodePort=30001 --set env.TZ="Asia/Seoul" --namespace kube-system
## 설치 확인
k get deploy,pod,svc,ep -n kube-system -l app.kubernetes.io/instance=kube-ops-view
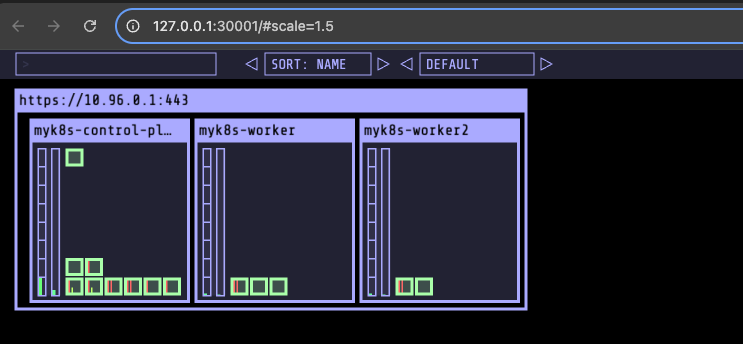
## kube-ops-view 접속
open "http://127.0.0.1:30001/#scale=1.5"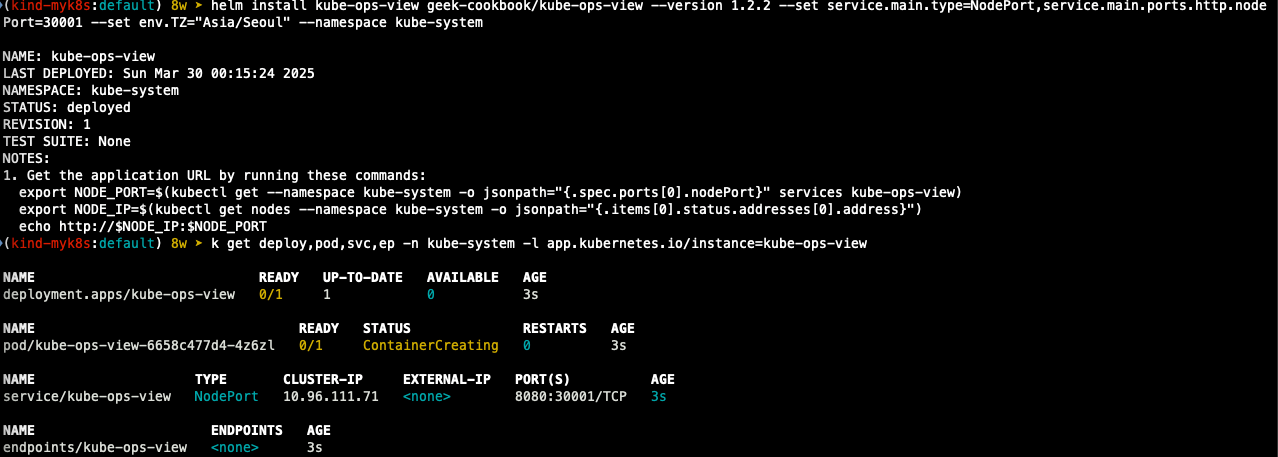
- Jenkins 설정 : Plugin 설치, 자격증명 설정
- Jenkins plugin 설치
- pipeline stage view
- docker pipeline
- gogs
- 자격증명 설정 : Jenkins 관리 -> Credentials -> Globals -> Add credentials
- Gogs Repo 자격증명 설정 : gogs-crd
- kind. : Username with password
- Username : devops
- Password : <Gogs Token>
- ID : gogs-crd
- Docker Hub 자격증명 설정 : gogs-crd
- kind : Username with password
- Username : <Docker username>
- password : <Docker Token or password>
- ID : dockerhub-crd
- k8s 자격증명 설정 : k8s-crd
- kind : Secret file
- file : kubeconfig 파일 업로드
- ID : k8s-crd
- Gogs Repo 자격증명 설정 : gogs-crd
- Jekins Item 생성(pipeline)
- name : jenkins-ci
## pipeline 내용
pipeline {
    agent any
    environment {
        DOCKER_IMAGE = '<자신의 도커 허브 계정>/dev-app' // Docker 이미지 이름
    }
    stages {
        stage('Checkout') {
            steps {
                 git branch: 'main',
                 url: 'http://<자신의 집 IP>:3000/devops/dev-app.git',  // Git에서 코드 체크아웃
                 credentialsId: 'gogs-crd'  // Credentials ID
            }
        }
        stage('Read VERSION') {
            steps {
                script {
                    // VERSION 파일 읽기
                    def version = readFile('VERSION').trim()
                    echo "Version found: ${version}"
                    // 환경 변수 설정
                    env.DOCKER_TAG = version
                }
            }
        }
        stage('Docker Build and Push') {
            steps {
                script {
                    docker.withRegistry('https://index.docker.io/v1/', 'dockerhub-crd') {
                        // DOCKER_TAG 사용
                        def appImage = docker.build("${DOCKER_IMAGE}:${DOCKER_TAG}")
                        appImage.push()
                        appImage.push("latest")
                    }
                }
            }
        }
    }
    post {
        success {
            echo "Docker image ${DOCKER_IMAGE}:${DOCKER_TAG} has been built and pushed successfully!"
        }
        failure {
            echo "Pipeline failed. Please check the logs."
        }
    }
}
- Item 생성 후 빌드 실행 후 확인
K8S에 어플리케이션 배포하기
# 디플로이먼트 오브젝트 배포 : 리플리카(파드 2개), 컨테이너 이미지 >> 아래 도커 계정 부분만 변경해서 배포해보자
DHUSER=<도커 허브 계정명>
DHUSER=tjdgns789

cat <<EOF | kubectl apply -f -
apiVersion: apps/v1
kind: Deployment
metadata:
  name: timeserver
spec:
  replicas: 2
  selector:
    matchLabels:
      pod: timeserver-pod
  template:
    metadata:
      labels:
        pod: timeserver-pod
    spec:
      containers:
      - name: timeserver-container
        image: docker.io/$DHUSER/dev-app:0.0.1
        livenessProbe:
          initialDelaySeconds: 30
          periodSeconds: 30
          httpGet:
            path: /healthz
            port: 80
            scheme: HTTP
          timeoutSeconds: 5
          failureThreshold: 3
          successThreshold: 1
EOF

watch -d kubectl get deploy,rs,pod -o wide

# 배포 상태 확인 : kube-ops-view 웹 확인
kubectl get events -w --sort-by '.lastTimestamp'
kubectl get deploy,pod -o wide
kubectl describe pod
레포에 접근 권한 문제로 Access Denied 오류가 발생하면서 파드 배포가 실패한다.


- secret 설정
DHUSER=<도커 허브 계정>
DHPASS=<도커 허브 암호 혹은 토큰>
echo $DHUSER $DHPASS

kubectl create secret docker-registry dockerhub-secret \
  --docker-server=https://index.docker.io/v1/ \
  --docker-username=$DHUSER \
  --docker-password=$DHPASS

# 확인
kubectl get secret
kubectl describe secret
kubectl get secrets -o yaml | kubectl neat  # base64 인코딩 확인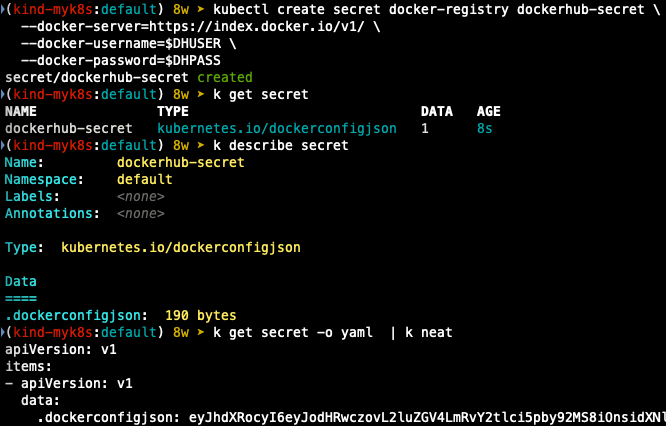
- 파드 재배포
cat <<EOF | kubectl apply -f -
apiVersion: apps/v1
kind: Deployment
metadata:
  name: timeserver
spec:
  replicas: 2
  selector:
    matchLabels:
      pod: timeserver-pod
  template:
    metadata:
      labels:
        pod: timeserver-pod
    spec:
      containers:
      - name: timeserver-container
        image: docker.io/$DHUSER/dev-app:0.0.1
        livenessProbe:
          initialDelaySeconds: 30
          periodSeconds: 30
          httpGet:
            path: /healthz
            port: 80
            scheme: HTTP
          timeoutSeconds: 5
          failureThreshold: 3
          successThreshold: 1
      imagePullSecrets:
      - name: dockerhub-secret
EOF
- yaml 파일을 수정해서 apply 하는 방법이 일방적이지만 실습에서는 edit으로 수정한 후 rollout을 통해 재배포했다.
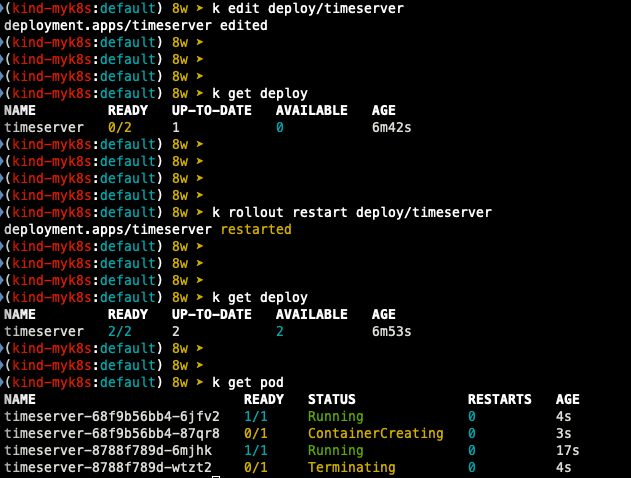
## pod 테스트를 위한 curl 파드 생성
k run curl-pod --image=curlimages/curl:latest --command -- sh -c "while true; do sleep 3600; done"
k get pod -o wide
## timeserver 파드 p 1개 확인 후 접속 확인
PODIP1=<timeserver ip>
k exec -it curl-pod --curl $PODIP1
k exec -it curl-pod --curl $PODIP1/healthz
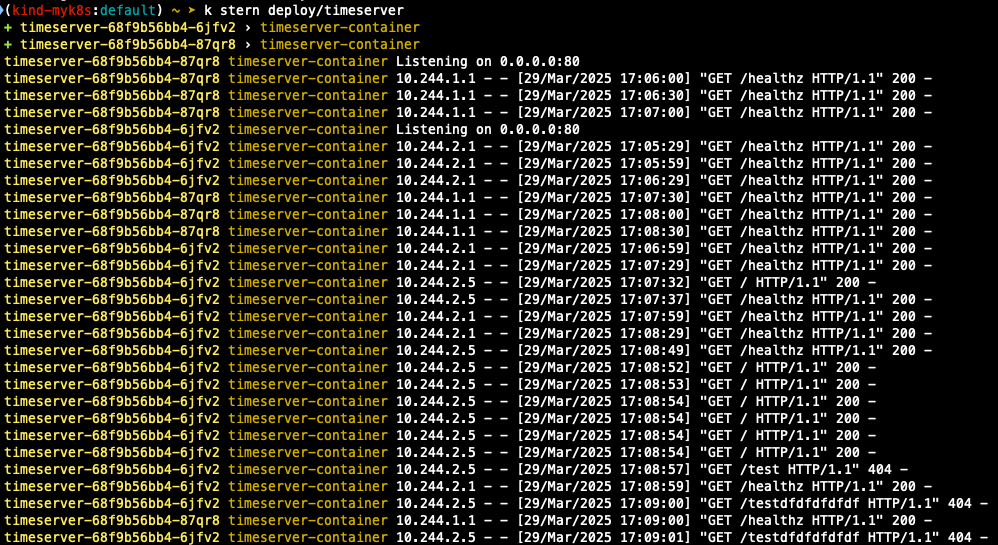
## logs 확인
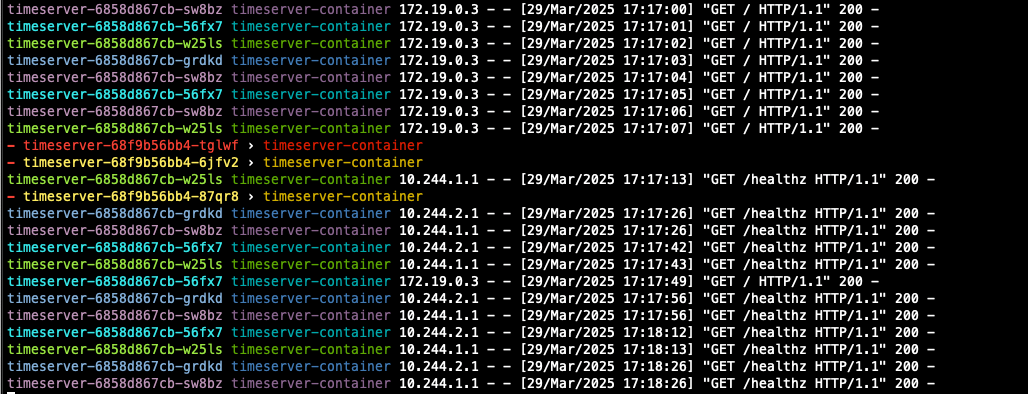
k logs deploy/timeserver
k stern deploy/timeserver
- 서비스 생성
cat <<EOF | kubectl apply -f -
apiVersion: v1
kind: Service
metadata:
  name: timeserver
spec:
  selector:
    pod: timeserver-pod
  ports:
  - port: 80
    targetPort: 80
    protocol: TCP
    nodePort: 30000
  type: NodePort
EOF

## 생성 확인
k get svc,ep timeserver -o wide

## 접속 테스트
k exec -it curl-pod -- curl timeserver
k exec -it curl-pod -- curl timeserver/healthz

curl http://127.0.0.1:3000

## 분산 테스트
for i in {1..100};  do curl -s http://127.0.0.1:30000 | grep name; done | sort | uniq -c | sort -nr

## 파드 증설
k scale deploy timeserver --replicas 4

## 분산 테스트
for i in {1..100};  do curl -s http://127.0.0.1:30000 | grep name; done | sort | uniq -c | sort -nr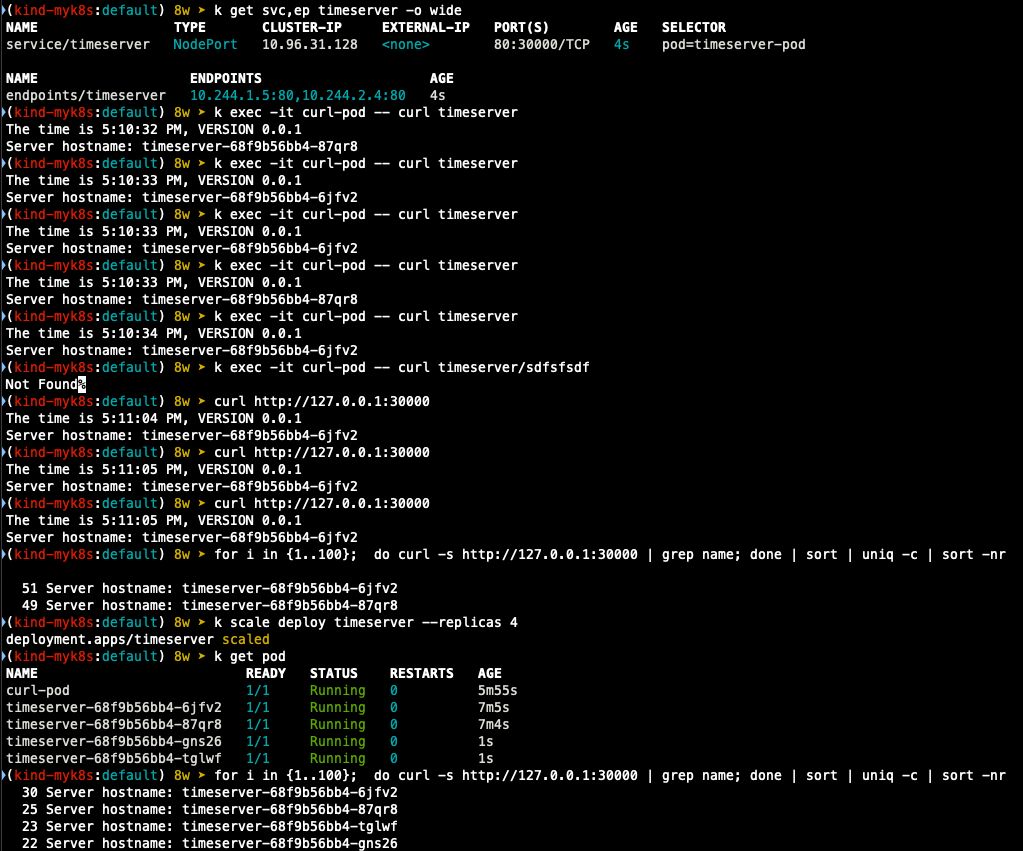
- 코드 업데이트 후 재배포
## VERSION 변경 : 0.0.2
## server.py : 0.0.2
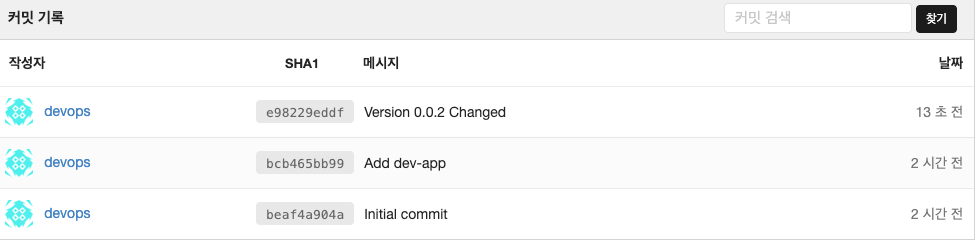
git add . && git commit -m "Version $(cat VERSION) Changed" && git push -u origin main
- commit 확인
## 파드 변경
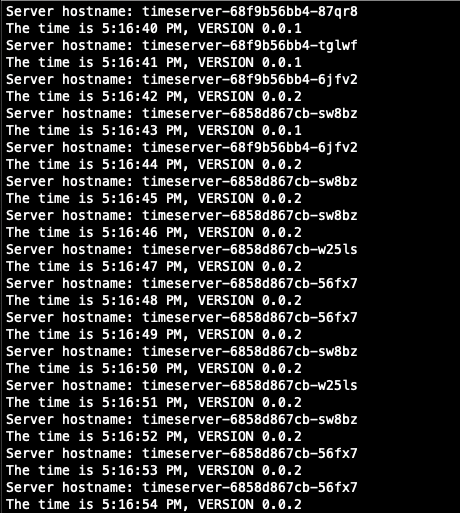
while true; do curl -s --connect-timeout 1 http://127.0.0.1:30000 ; sleep 1 ; done
## 이미지 변경
k set image deployment timeserver timeserver-container=$DHUSER/dev-app:0.0.Y && watch -d "kubectl get deploy,ep timeserver; echo; kubectl get rs,pod"
## 모니터링
watch -d kubectl get deploy,rs,pod,svc,ep -o wide
## 접속 테스트
curl http://127.0.0.1:30000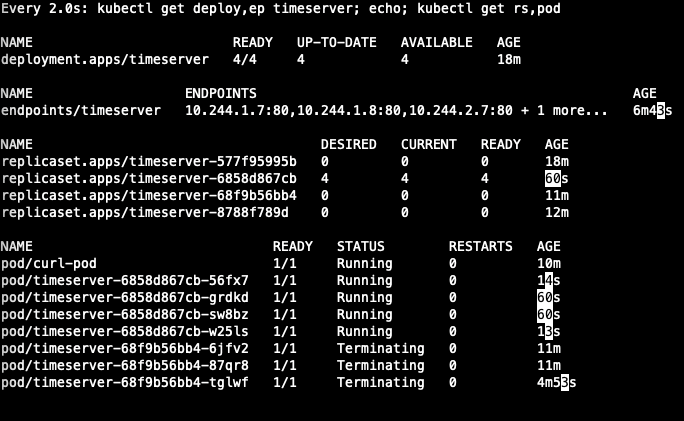
gogs webhooks 설정

- gogs 설정 파일 수정
# 경로 : /data/gogs/conf/app.ini

[security]
INSTALL_LOCK = true
SECRET_KEY   = PbNNZNR7Lg1Zr4z
## 아래 라인 추가 : 로컬 PC IP
LOCAL_NETWORK_ALLOWLIST = 192.168.219.104

## 컨테이너 재시작
docker compose restart gogs
gogs > dev-app repo > settings > webhooks 에서 생성

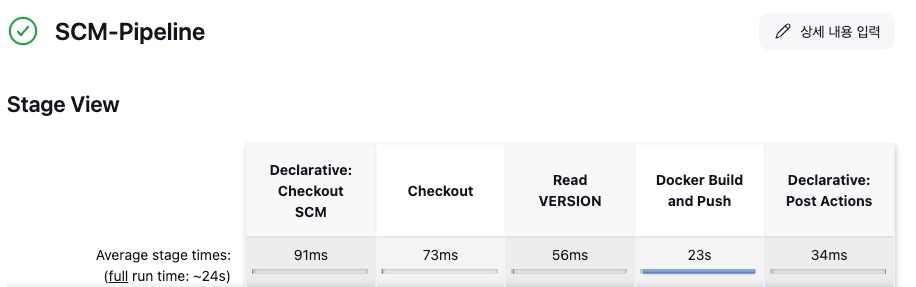
- Jenkins Item 생성
- item name : SCM-Pipeline
- github project : <dev-app repo url>
- user gogs secret : qwe123
- triggers : Build when a change is pushed to Gogs (check)
- Pipeline script from SCM
- jenkins 파일 생성
# Jenkinsfile 빈 파일 작성
touch Jenkinsfile

# VERSION 파일 : 0.0.3 수정
# server.py 파일 : 0.0.3 수정pipeline {
agent any
environment {
DOCKER_IMAGE = '<자신의 도커 허브 계정>/dev-app' // Docker 이미지 이름
}
stages {
stage('Checkout') {
steps {
git branch: 'main',
url: 'http://<자신의 집 IP>:3000/devops/dev-app.git', // Git에서 코드 체크아웃
credentialsId: 'gogs-crd' // Credentials ID
}
}
stage('Read VERSION') {
steps {
script {
// VERSION 파일 읽기
def version = readFile('VERSION').trim()
echo "Version found: ${version}"
// 환경 변수 설정
env.DOCKER_TAG = version
}
}
}
stage('Docker Build and Push') {
steps {
script {
docker.withRegistry('https://index.docker.io/v1/', 'dockerhub-crd') {
// DOCKER_TAG 사용
def appImage = docker.build("${DOCKER_IMAGE}:${DOCKER_TAG}")
appImage.push()
appImage.push("latest")
}
}
}
}
}
post {
success {
echo "Docker image ${DOCKER_IMAGE}:${DOCKER_TAG} has been built and pushed successfully!"
}
failure {
echo "Pipeline failed. Please check the logs."
}
}
}
- 업데이트 파일 git push
git add . && git commit -m "VERSION $(cat VERSION) Changed" && git push -u origin main
- Gogs webhook 기록 확인
- 도커 저장소 확인
- Jenkins 트리거 빌드 확인
- cluster에 신규 버전 적용
## 신규 이미지 업데이트
k set image deployment timeserver timeserver-container=$DHUSER/dev-app:0.0.3 && while true; do curl -s --connect-timeout 1 http://127.0.0.1:30000 ; sleep 1 ; done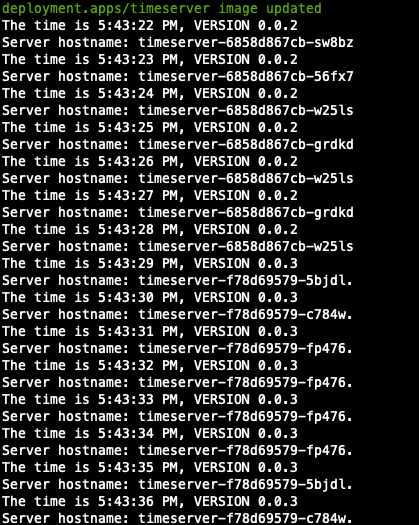
Jenkins CI/CD + K8S (Kind)
Jenkins 컨테이너 내부에 툴 설치
docker compose exec --privileged -u root jenkins bash
## kubectl 설치
curl -LO "https://dl.k8s.io/release/$(curl -L -s https://dl.k8s.io/release/stable.txt)/bin/linux/arm64/kubectl"
install -o root -g root -m 0755 kubectl /usr/local/bin/kubectl
kubectl version --client=true
## helm 설치
curl https://raw.githubusercontent.com/helm/helm/main/scripts/get-helm-3 | bash
helm version
Jenkins item 생성
pipeline {
agent any
environment {
KUBECONFIG = credentials('k8s-crd')
}
stages {
stage('List Pods') {
steps {
sh '''
# Fetch and display Pods
kubectl get pods -A --kubeconfig "$KUBECONFIG"
'''
}
}
}
}
Jenkins를 이용한 blue-green 배포
- deploy / svc yaml 파일 작성
#
cd dev-app
#
mkdir deploy
# Blue 앱 yaml 작성
cat > deploy/echo-server-blue.yaml <<EOF
apiVersion: apps/v1
kind: Deployment
metadata:
name: echo-server-blue
spec:
replicas: 2
selector:
matchLabels:
app: echo-server
version: blue
template:
metadata:
labels:
app: echo-server
version: blue
spec:
containers:
- name: echo-server
image: hashicorp/http-echo
args:
- "-text=Hello from Blue"
ports:
- containerPort: 5678
EOF
# service yaml 작성
cat > deploy/echo-server-service.yaml <<EOF
apiVersion: v1
kind: Service
metadata:
name: echo-server-service
spec:
selector:
app: echo-server
version: blue
ports:
- protocol: TCP
port: 80
targetPort: 5678
nodePort: 30000
type: NodePort
EOF
# Green 앱 yaml 작성
cat > deploy/echo-server-green.yaml <<EOF
apiVersion: apps/v1
kind: Deployment
metadata:
name: echo-server-green
spec:
replicas: 2
selector:
matchLabels:
app: echo-server
version: green
template:
metadata:
labels:
app: echo-server
version: green
spec:
containers:
- name: echo-server
image: hashicorp/http-echo
args:
- "-text=Hello from Green"
ports:
- containerPort: 5678
EOF
# git 배포
git add . && git commit -m "Add echo server yaml" && git push -u origin main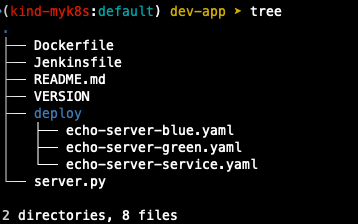
- Jenkins item 생성
## 이전 실습 자원 삭제
k delete deploy,svc timeserver
## 반복 접속 실행
while true; do curl -s --connect-timeout 1 http://127.0.0.1:30000 ; date ; echo "------------" ; sleep 1 ; done
## pipeline script 작성
pipeline {
agent any
environment {
KUBECONFIG = credentials('k8s-crd')
}
stages {
stage('Checkout') {
steps {
git branch: 'main',
url: 'http://<자신의 집 IP>:3000/devops/dev-app.git', // Git에서 코드 체크아웃
credentialsId: 'gogs-crd' // Credentials ID
}
}
stage('container image build') {
steps {
echo "container image build"
}
}
stage('container image upload') {
steps {
echo "container image upload"
}
}
stage('k8s deployment blue version') {
steps {
sh "kubectl apply -f ./deploy/echo-server-blue.yaml --kubeconfig $KUBECONFIG"
sh "kubectl apply -f ./deploy/echo-server-service.yaml --kubeconfig $KUBECONFIG"
}
}
stage('approve green version') {
steps {
input message: 'approve green version', ok: "Yes"
}
}
stage('k8s deployment green version') {
steps {
sh "kubectl apply -f ./deploy/echo-server-green.yaml --kubeconfig $KUBECONFIG"
}
}
stage('approve version switching') {
steps {
script {
returnValue = input message: 'Green switching?', ok: "Yes", parameters: [booleanParam(defaultValue: true, name: 'IS_SWITCHED')]
if (returnValue) {
sh "kubectl patch svc echo-server-service -p '{\"spec\": {\"selector\": {\"version\": \"green\"}}}' --kubeconfig $KUBECONFIG"
}
}
}
}
stage('Blue Rollback') {
steps {
script {
returnValue = input message: 'Blue Rollback?', parameters: [choice(choices: ['done', 'rollback'], name: 'IS_ROLLBACk')]
if (returnValue == "done") {
sh "kubectl delete -f ./deploy/echo-server-blue.yaml --kubeconfig $KUBECONFIG"
}
if (returnValue == "rollback") {
sh "kubectl patch svc echo-server-service -p '{\"spec\": {\"selector\": {\"version\": \"blue\"}}}' --kubeconfig $KUBECONFIG"
}
}
}
}
}
}
- 지금 빌드 후 동작 확인

- Blue가 배포된 상태에서 재배포 시 캡처와 같이 green으로 변경하겠냐는 alert 박스 표시
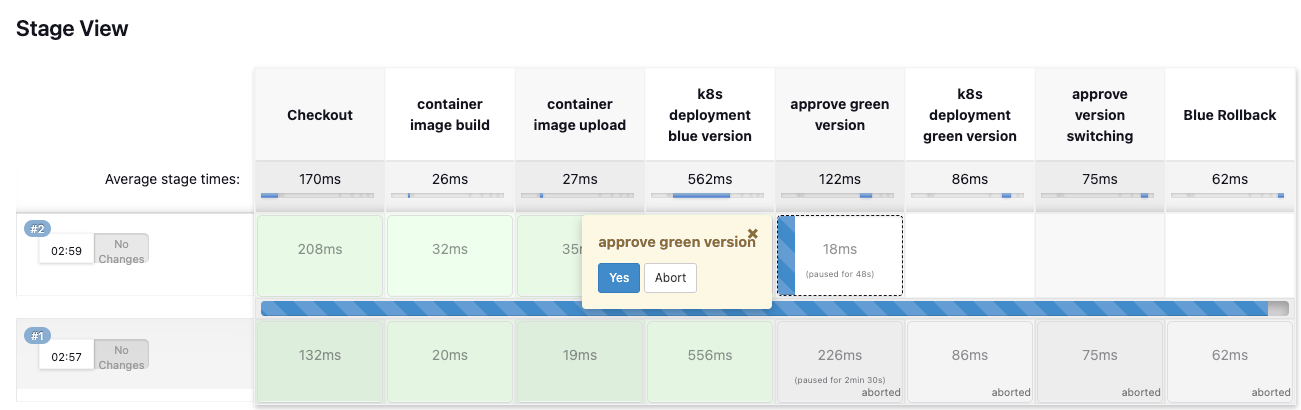
- yes 클릭 시 green이 배포되는 것을 확인

- 특이 사항이 없다면 Green으로 스위칭 진행
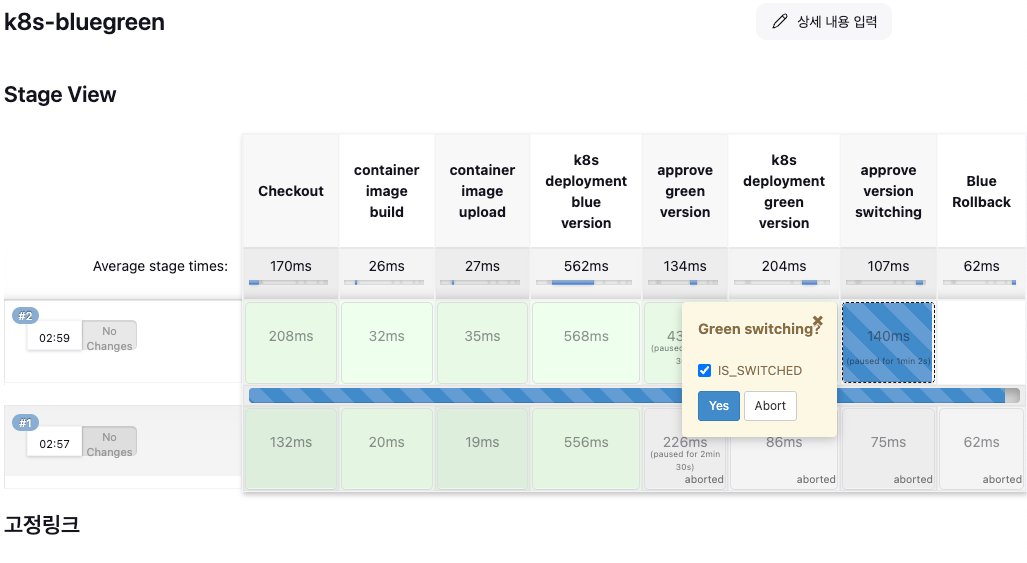
- done 클릭 : green에 특이 사항이 있어 롤백해야하는경우 rollback 선택
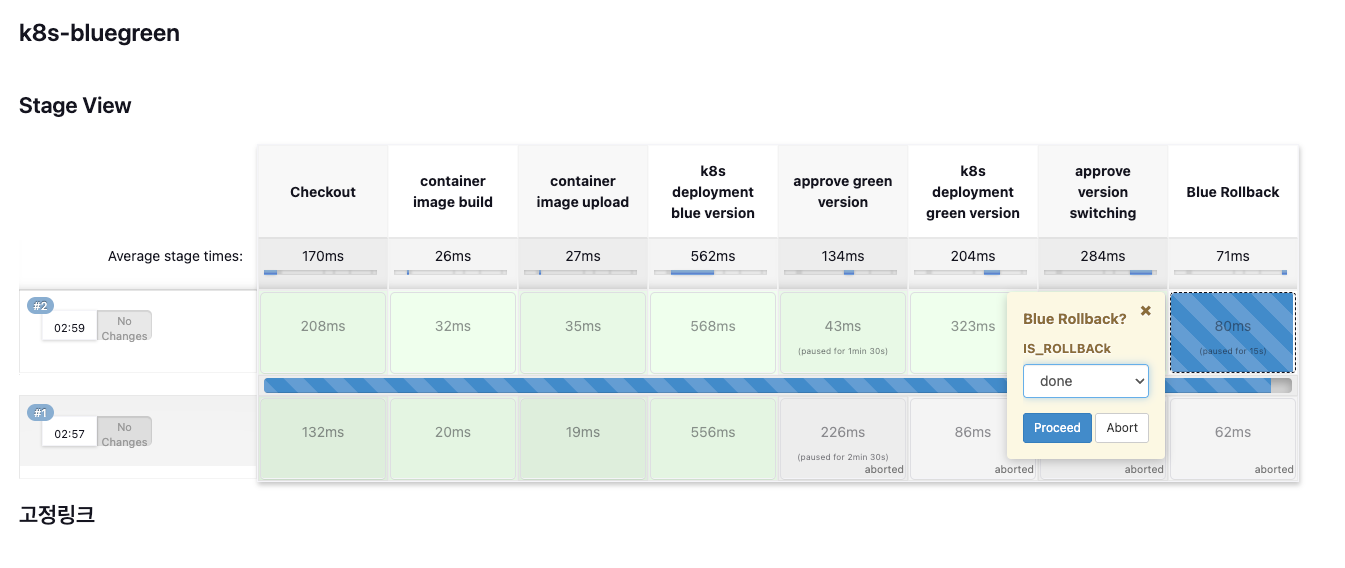
- 최종 배포 확인

Argo CD + K8S(kind)
Argo CD 아키텍처
GIT -> (DESIRED) ArgoCD (LIVE) => K8S
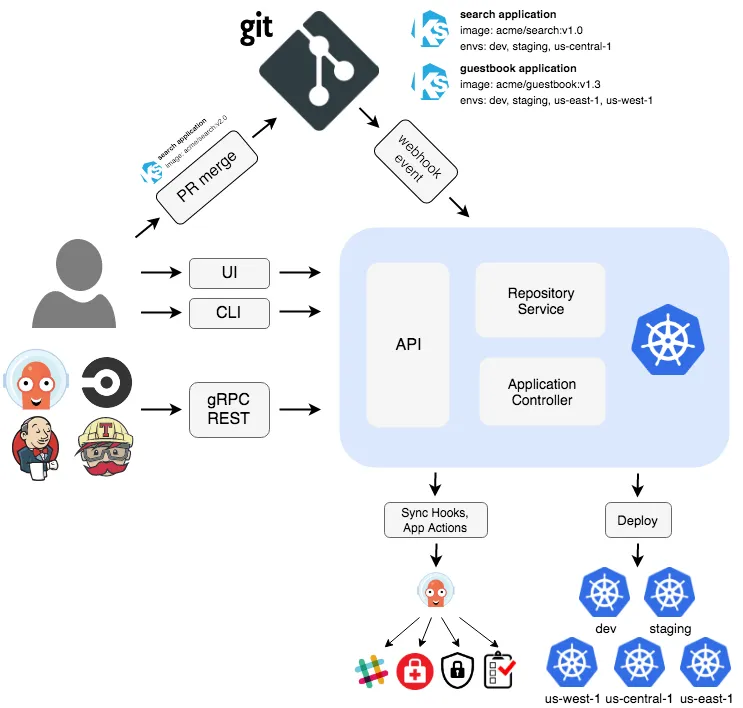
- API Server : Web UI 대시보드, k8s api 처럼 API 서버 역할
- Repository Server : Git 연결 및 배포할 yaml 생성
- Application Controller : k8s 리소스 모니터링, Git과 비교
- Redis : k8s api와 git 요청을 줄이기 위한 캐싱
- Notification : 이벤트 알림, 트리거
- Dex : 외부 인증 관리
- ApplicationSet Controller : 멀티 클러스터를 위한 App 패키징 관리
- ArgoCD 설치
## 네임스페이스 생성
k create ns argocd
## helm 배포를 위한 values 파일 생성
cat <<EOF > argocd-values.yaml
dex:
enabled: false
server:
service:
type: NodePort
nodePortHttps: 30002
extraArgs:
- --insecure # HTTPS 대신 HTTP 사용
EOF
## 설치
helm repo add argo https://argoproj.github.io/argo-helm
helm install argocd argo/argo-cd --version 7.7.10 -f argocd-values.yaml --namespace argocd
## 확인
k get pod,svc,ep,secret,cm -n argocd
k get crd | grep argo
k get appproject -n argocd -o yaml
## configmap 확인
k get cm -n argocd argocd-cm -o yaml
k get cm -n argocd argocd-rbac-cm -o yaml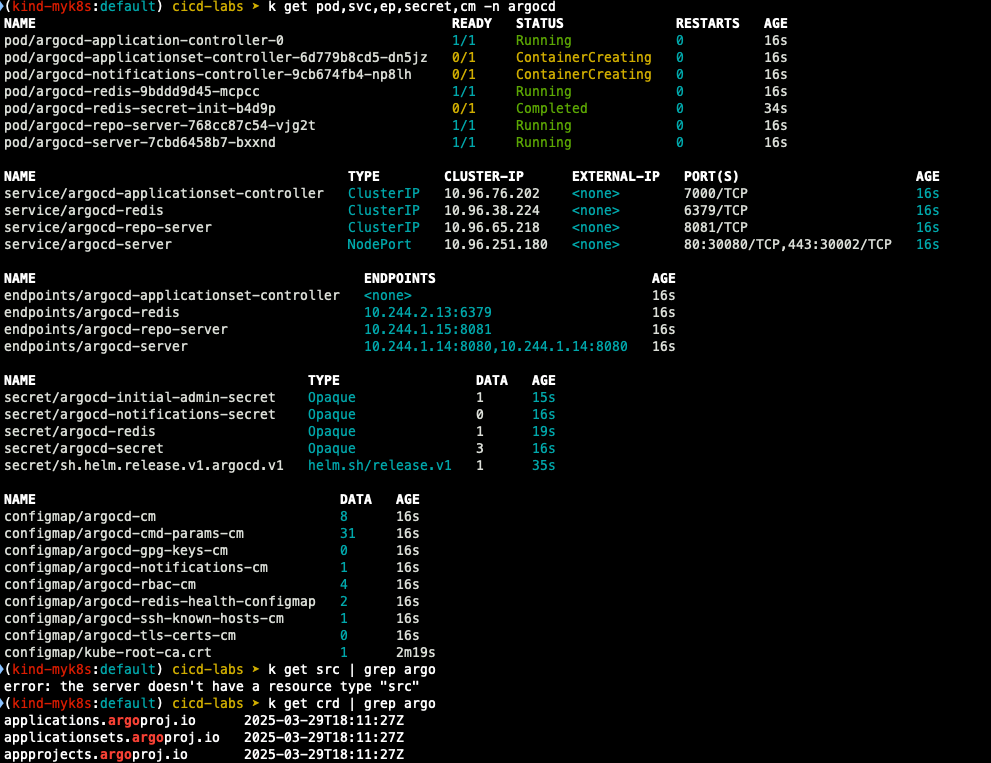
최초 접속 암호 확인
## 암호 확인
k -n argocd get secret argocd-initial-admin-secret -o jsonpath="{.data.password}" | base64 -d ;echo
## 웹 페이지 접속
open http://127.0.0.1:30002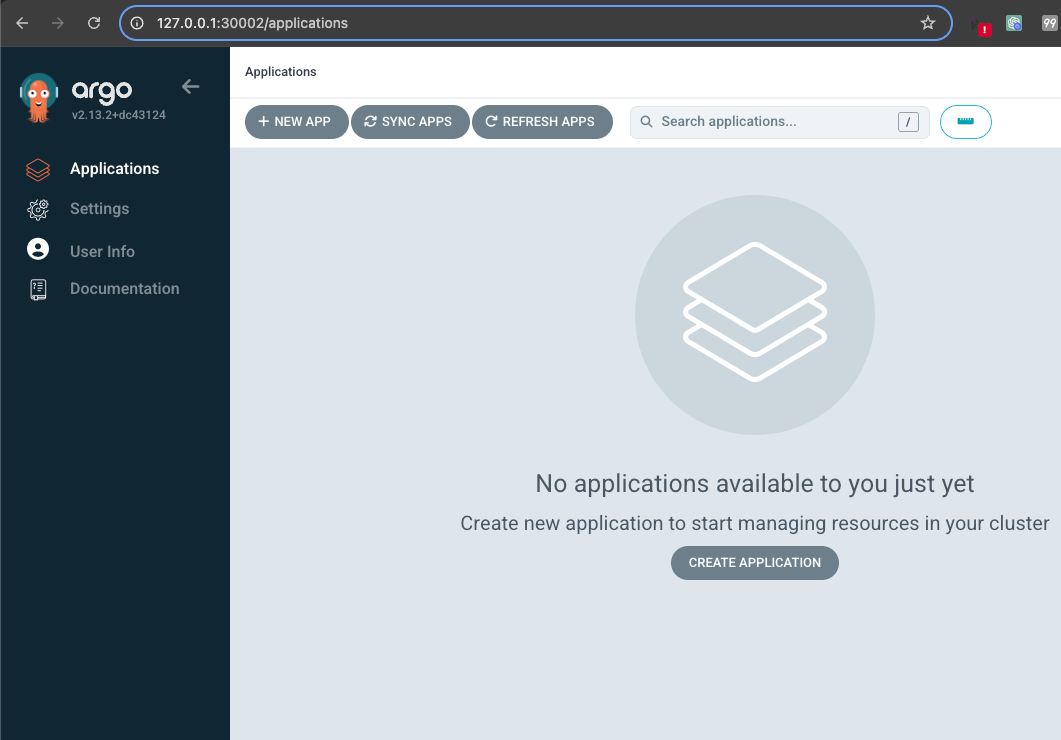
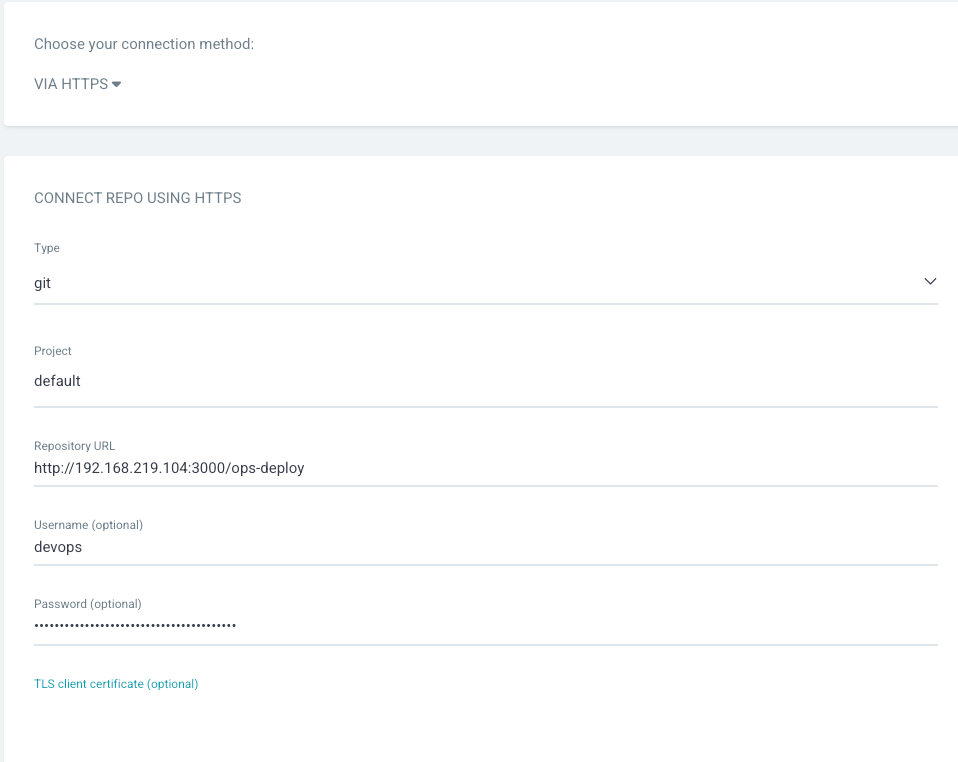
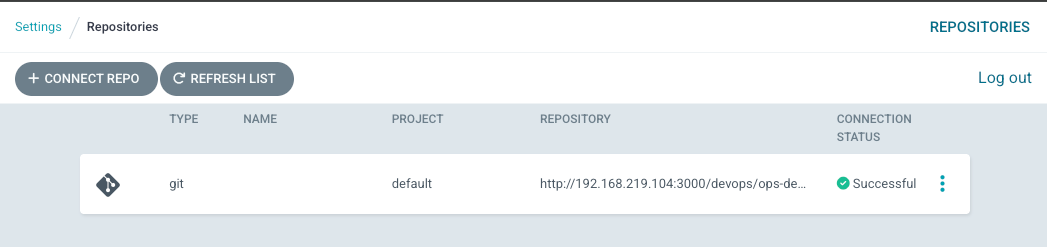
- repo 등록
[settings > repository > connect repo 클릭]
아래와 같이 정보 입력 : 패스워드는 gogs token
helm chart 배포 실습 (기초)
cd cicd-labs
mkdir nginx-chart
cd nginx-chart
mkdir templates
cat > templates/configmap.yaml <<EOF
apiVersion: v1
kind: ConfigMap
metadata:
name: {{ .Release.Name }}
data:
index.html: |
{{ .Values.indexHtml | indent 4 }}
EOF
cat > templates/deployment.yaml <<EOF
apiVersion: apps/v1
kind: Deployment
metadata:
name: {{ .Release.Name }}
spec:
replicas: {{ .Values.replicaCount }}
selector:
matchLabels:
app: {{ .Release.Name }}
template:
metadata:
labels:
app: {{ .Release.Name }}
spec:
containers:
- name: nginx
image: {{ .Values.image.repository }}:{{ .Values.image.tag }}
ports:
- containerPort: 80
volumeMounts:
- name: index-html
mountPath: /usr/share/nginx/html/index.html
subPath: index.html
volumes:
- name: index-html
configMap:
name: {{ .Release.Name }}
EOF
cat > templates/service.yaml <<EOF
apiVersion: v1
kind: Service
metadata:
name: {{ .Release.Name }}
spec:
selector:
app: {{ .Release.Name }}
ports:
- protocol: TCP
port: 80
targetPort: 80
nodePort: 30000
type: NodePort
EOF
cat > values.yaml <<EOF
indexHtml: |
<!DOCTYPE html>
<html>
<head>
<title>Welcome to Nginx!</title>
</head>
<body>
<h1>Hello, Kubernetes!</h1>
<p>Nginx version 1.26.1</p>
</body>
</html>
image:
repository: nginx
tag: 1.26.1
replicaCount: 1
EOF
cat > Chart.yaml <<EOF
apiVersion: v2
name: nginx-chart
description: A Helm chart for deploying Nginx with custom index.html
type: application
version: 1.0.0
appVersion: "1.26.1"
EOF
## 배포
helm template dev-nginx . -f values.yaml
helm install dev-nginx . -f values.yaml
helm list
kubectl get deploy,svc,ep,cm dev-nginx -owide
## 접속 테스트
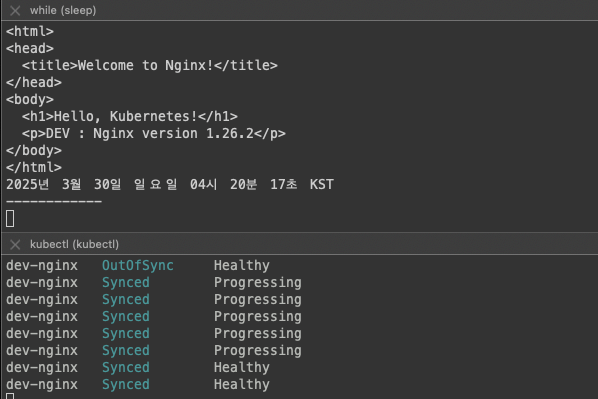
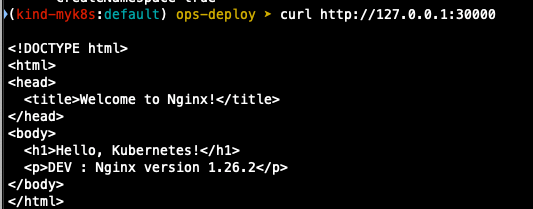
curl http://127.0.0.1:30000
curl -s http://127.0.0.1:30000 | grep version
open http://127.0.0.1:30000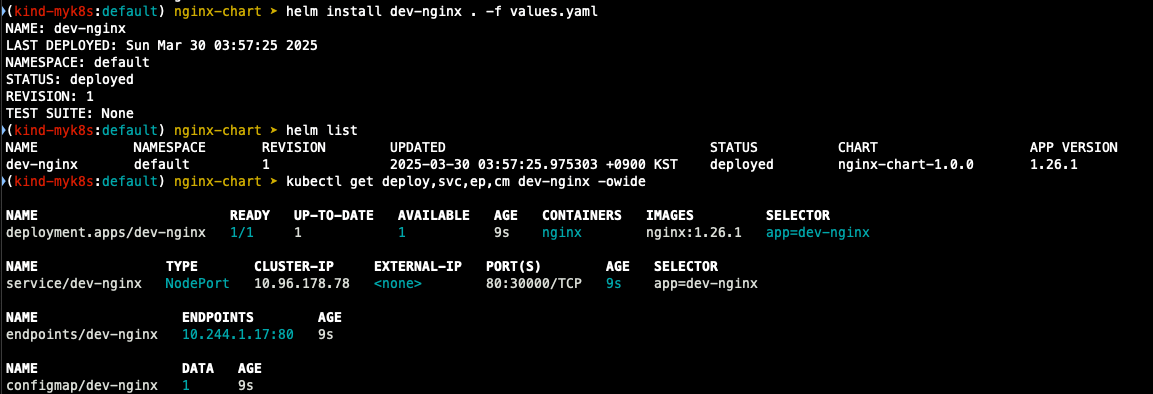

## value 값 변경 후 재배포
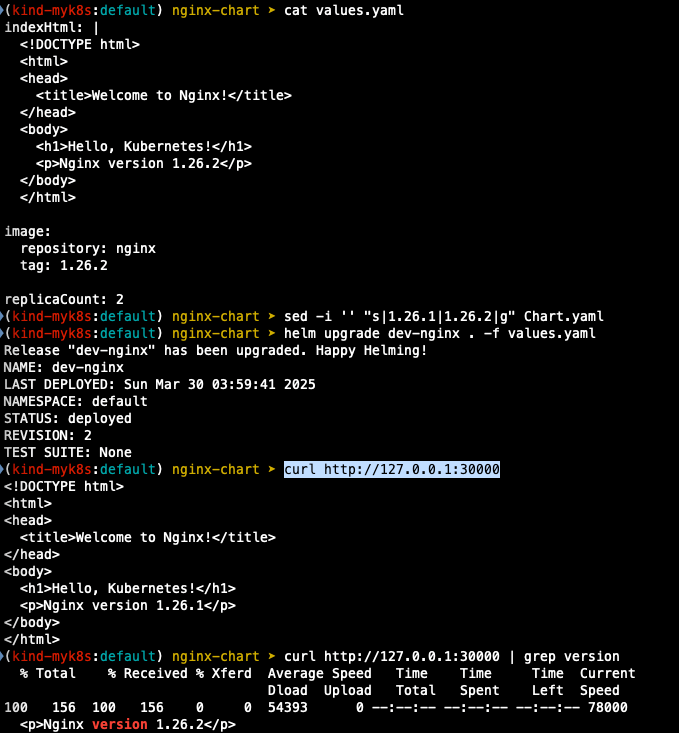
cat > values.yaml <<EOF
indexHtml: |
<!DOCTYPE html>
<html>
<head>
<title>Welcome to Nginx!</title>
</head>
<body>
<h1>Hello, Kubernetes!</h1>
<p>Nginx version 1.26.2</p>
</body>
</html>
image:
repository: nginx
tag: 1.26.2
replicaCount: 2
EOF
## 변경된 버전으로 chart 치환
sed -i '' "s|1.26.1|1.26.2|g" Chart.yaml
## helm chart 업그레이드
helm template dev-nginx . -f values.yaml
helm upgrade dev-nginx . -f values.yaml
## 접속 확인
curl http://127.0.0.1:30000
curl http://127.0.0.1:30000 | grep version

Repo(ops-deploy) 에 nginx helm chart 를 Argo CD를 통한 배포 1
- git 작업
cd cicd-labs
git clone http://devops:$TOKEN@$MyIP:3000/devops/ops-deploy.git
cd ops-deploy
## git 설정
git --no-pager config --local --list
git config --local user.name "devops"
git config --local user.email "a@a.com"
git config --local init.defaultBranch main
git config --local credential.helper store
git --no-pager config --local --list
cat .git/config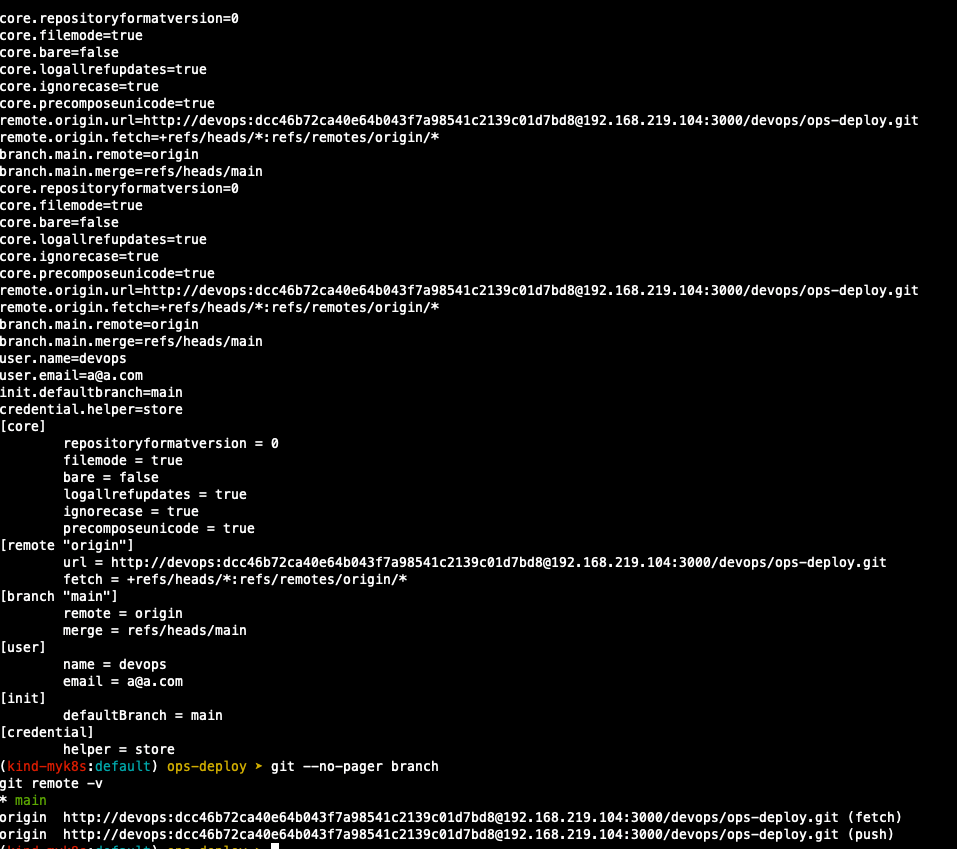
## helm 차트 작성
VERSION=1.26.1
mkdir nginx-chart
mkdir nginx-chart/templates
cat > nginx-chart/VERSION <<EOF
$VERSION
EOF
cat > nginx-chart/templates/configmap.yaml <<EOF
apiVersion: v1
kind: ConfigMap
metadata:
name: {{ .Release.Name }}
data:
index.html: |
{{ .Values.indexHtml | indent 4 }}
EOF
cat > nginx-chart/templates/deployment.yaml <<EOF
apiVersion: apps/v1
kind: Deployment
metadata:
name: {{ .Release.Name }}
spec:
replicas: {{ .Values.replicaCount }}
selector:
matchLabels:
app: {{ .Release.Name }}
template:
metadata:
labels:
app: {{ .Release.Name }}
spec:
containers:
- name: nginx
image: {{ .Values.image.repository }}:{{ .Values.image.tag }}
ports:
- containerPort: 80
volumeMounts:
- name: index-html
mountPath: /usr/share/nginx/html/index.html
subPath: index.html
volumes:
- name: index-html
configMap:
name: {{ .Release.Name }}
EOF
cat > nginx-chart/templates/service.yaml <<EOF
apiVersion: v1
kind: Service
metadata:
name: {{ .Release.Name }}
spec:
selector:
app: {{ .Release.Name }}
ports:
- protocol: TCP
port: 80
targetPort: 80
nodePort: 30000
type: NodePort
EOF
cat > nginx-chart/values-dev.yaml <<EOF
indexHtml: |
<!DOCTYPE html>
<html>
<head>
<title>Welcome to Nginx!</title>
</head>
<body>
<h1>Hello, Kubernetes!</h1>
<p>DEV : Nginx version $VERSION</p>
</body>
</html>
image:
repository: nginx
tag: $VERSION
replicaCount: 1
EOF
cat > nginx-chart/values-prd.yaml <<EOF
indexHtml: |
<!DOCTYPE html>
<html>
<head>
<title>Welcome to Nginx!</title>
</head>
<body>
<h1>Hello, Kubernetes!</h1>
<p>PRD : Nginx version $VERSION</p>
</body>
</html>
image:
repository: nginx
tag: $VERSION
replicaCount: 2
EOF
cat > nginx-chart/Chart.yaml <<EOF
apiVersion: v2
name: nginx-chart
description: A Helm chart for deploying Nginx with custom index.html
type: application
version: 1.0.0
appVersion: "$VERSION"
EOF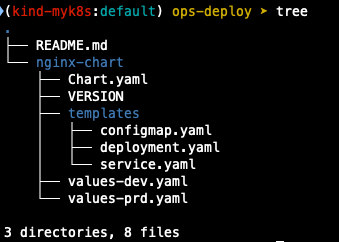
## helm 확인 및 변수 지정
helm template dev-nginx nginx-chart -f nginx-chart/values-dev.yaml
helm template prd-nginx nginx-chart -f nginx-chart/values-prd.yaml
DEVNGINX=$(helm template dev-nginx nginx-chart -f nginx-chart/values-dev.yaml | sed 's/---//g')
PRDNGINX=$(helm template prd-nginx nginx-chart -f nginx-chart/values-prd.yaml | sed 's/---//g')
diff <(echo "$DEVNGINX") <(echo "$PRDNGINX")
## git push
git add . && git commit -m "Add nginx helm chart" && git push -u origin main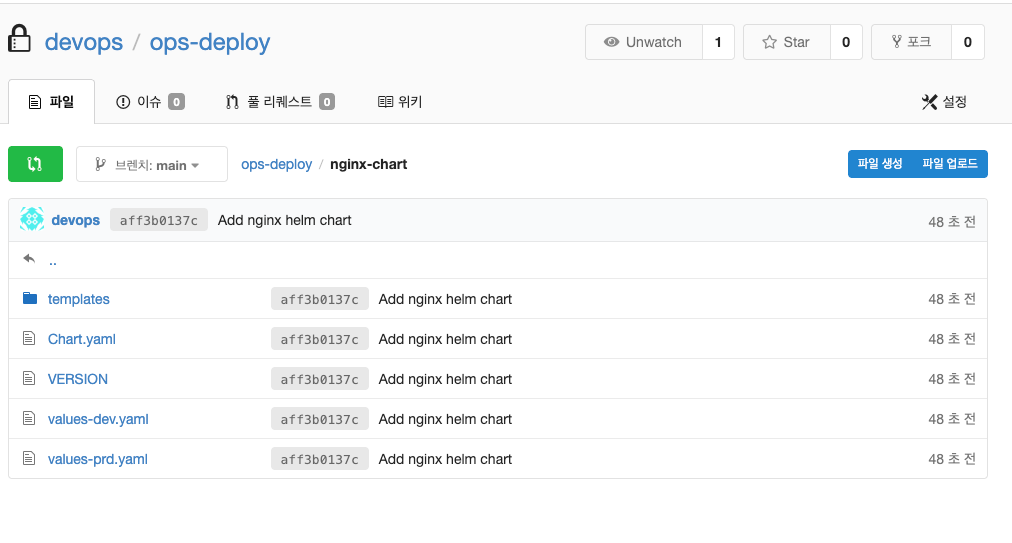
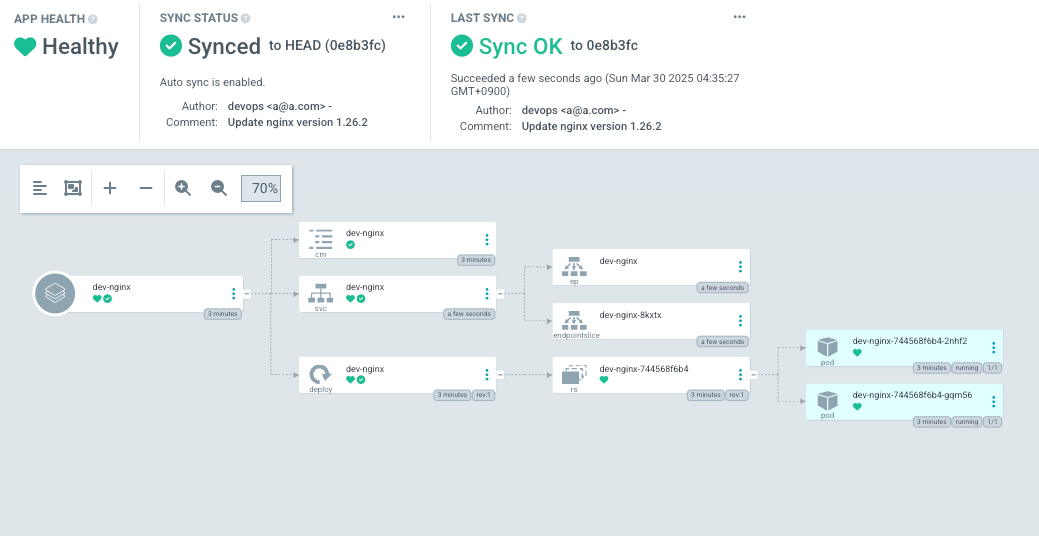
- Argo CD에 app 등록 (dev)
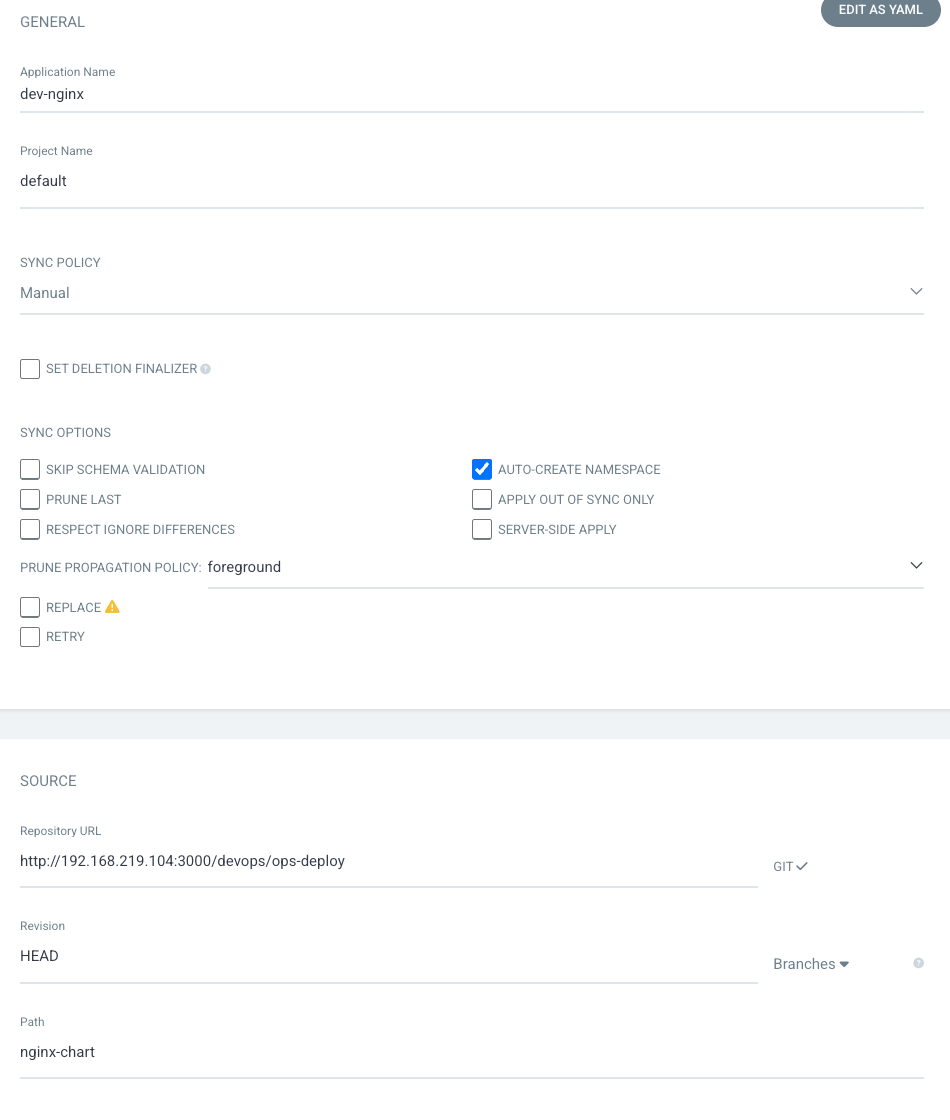
- PRUNE : GIt에서 자원 삭제 후 배포시 K8S에서는 삭제되지 않으나, 해당 옵션을 선택하면 삭제시킴
- FORCE : --force 옵션으로 리소스 삭제
- APPLY ONLY : ArgoCD의 Pre/Post Hook은 사용 안함 (리소스만 배포)
- DRY RUN : 테스트 배포 (배포에 에러가 있는지 한번 확인해 볼때 사용)
## 배포 상태 확인
k get applications -n argocd
k describe applications -n argocd dev-nginx
## 상태 모니터링
k get applications -n argocd -w
## 반복 접속 시도
while true; do curl -s --connect-timeout 1 http://127.0.0.1:30000 ; date ; echo "------------" ; sleep 1 ; done
- argocd 포털에서 sync 하기전에 생성될 자원 확인
- Version 변경하여 배포
#
VERSION=1.26.2
cat > nginx-chart/VERSION <<EOF
$VERSION
EOF
cat > nginx-chart/values-dev.yaml <<EOF
indexHtml: |
<!DOCTYPE html>
<html>
<head>
<title>Welcome to Nginx!</title>
</head>
<body>
<h1>Hello, Kubernetes!</h1>
<p>DEV : Nginx version $VERSION</p>
</body>
</html>
image:
repository: nginx
tag: $VERSION
replicaCount: 2
EOF
cat > nginx-chart/values-prd.yaml <<EOF
indexHtml: |
<!DOCTYPE html>
<html>
<head>
<title>Welcome to Nginx!</title>
</head>
<body>
<h1>Hello, Kubernetes!</h1>
<p>PRD : Nginx version $VERSION</p>
</body>
</html>
image:
repository: nginx
tag: $VERSION
replicaCount: 2
EOF
cat > nginx-chart/Chart.yaml <<EOF
apiVersion: v2
name: nginx-chart
description: A Helm chart for deploying Nginx with custom index.html
type: application
version: 1.0.0
appVersion: "$VERSION"
EOF
#
git add . && git commit -m "Update nginx version $(cat nginx-chart/VERSION)" && git push -u origin main
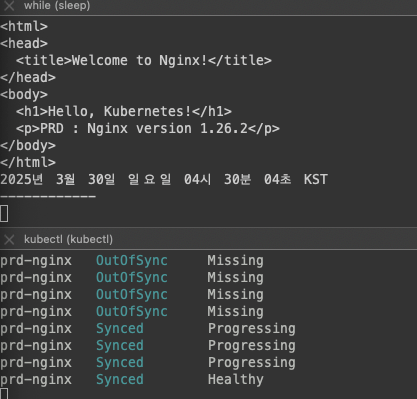
- argocd 웹에서 refresh를 통해 outofsync 확인

- sync 진행 후 변경 사항 적용 확인
- 테스트 자원 삭제

Repo(ops-deploy) 에 nginx helm chart 를 Argo CD를 통한 배포 2 : ArgoCD Declarative Setup
- k8s finalizers 와 Argo Finalizers 동작

- Kubernetes에서 finalizers는 리소스의 metadata.finalizers 필드에 정의된 이름 목록으로, 리소스가 삭제 요청을 받았을 때(즉, kubectl delete나 API 호출로 삭제가 시작될 때) 바로 제거되지 않고, 지정된 작업이 완료될 때까지 "종료 중"(Terminating) 상태로 유지
- ArgoCD는 이 메커니즘을 활용해 애플리케이션 삭제 시 관리 대상 리소스의 정리(cleanup)를 제어함
- ArgoCD에서 가장 흔히 사용되는 finalizer는 resources-finalizer.argocd.argoproj.io 이 finalizer는 애플리케이션이 삭제될 때 해당 애플리케이션이 관리하는 모든 리소스(예: Pod, Service, ConfigMap 등)를 함께 삭제하도록 보장함
- ArgoCD Finalizers의 목적
1. 리소스 정리 보장: 애플리케이션 삭제 시 관련 리소스가 남지 않도록 보장함
이는 GitOps 워크플로우에서 선언적 상태를 유지하는 데 중요함
2. 의도치 않은 삭제 방지 : finalizer가 없으면 실수로 Argo App을 삭제해도 K8S 리소스가 남아 혼란이 생길 수 있습니다.
finalizer는 이를 방지함
3. App of Apps 패턴 지원: 여러 애플리케이션을 계층적으로 관리할 때, 상위 애플리케이션 삭제 시 하위 리소스까지 정리
- dev-nginx App 생성 및 Auto Sync
#
echo $MyIP
## argo app 생성
cat <<EOF | kubectl apply -f -
apiVersion: argoproj.io/v1alpha1
kind: Application
metadata:
name: dev-nginx
namespace: argocd
finalizers:
- resources-finalizer.argocd.argoproj.io
spec:
project: default
source:
helm:
valueFiles:
- values-dev.yaml
path: nginx-chart
repoURL: http://$MyIP:3000/devops/ops-deploy
targetRevision: HEAD
syncPolicy:
automated:
prune: true
syncOptions:
- CreateNamespace=true
destination:
namespace: dev-nginx
server: https://kubernetes.default.svc
EOF
# 생성 확인
kubectl get applications -n argocd dev-nginx
kubectl get applications -n argocd dev-nginx -o yaml | kubectl neat
kubectl describe applications -n argocd dev-nginx
kubectl get pod,svc,ep,cm -n dev-nginx
# 접속 테스트
curl http://127.0.0.1:30000
open http://127.0.0.1:30000
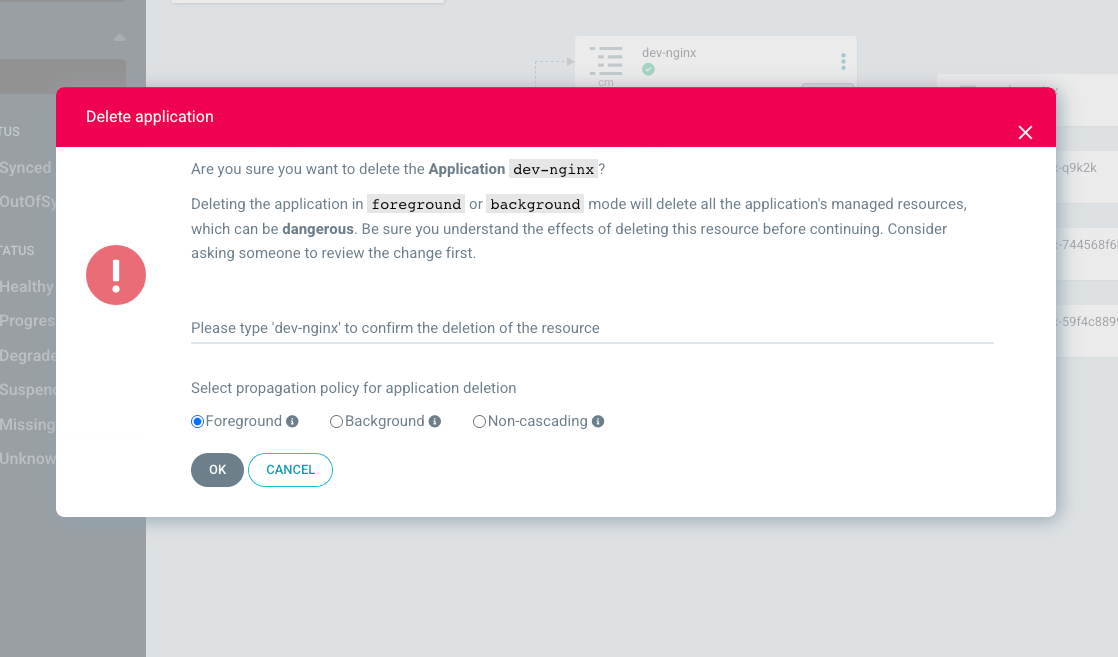
# Argo CD App 삭제
kubectl delete applications -n argocd dev-nginx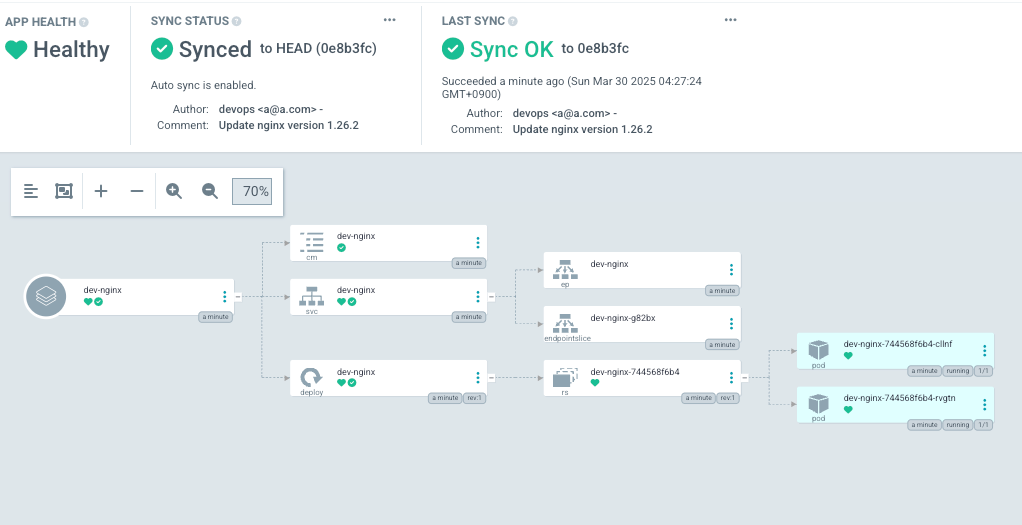
- prd-nginx App 생성 및 Auto SYNC
# argo app 생성
cat <<EOF | kubectl apply -f -
apiVersion: argoproj.io/v1alpha1
kind: Application
metadata:
name: prd-nginx
namespace: argocd
finalizers:
- resources-finalizer.argocd.argoproj.io
spec:
destination:
namespace: prd-nginx
server: https://kubernetes.default.svc
project: default
source:
helm:
valueFiles:
- values-prd.yaml
path: nginx-chart
repoURL: http://$MyIP:3000/devops/ops-deploy
targetRevision: HEAD
syncPolicy:
automated:
prune: true
syncOptions:
- CreateNamespace=true
EOF
# 생성 확인
kubectl get applications -n argocd prd-nginx
kubectl describe applications -n argocd prd-nginx
kubectl get pod,svc,ep,cm -n prd-nginx
# 접속 테스트
curl http://127.0.0.1:30000
open http://127.0.0.1:30000
# Argo CD App 삭제
kubectl delete applications -n argocd prd-nginx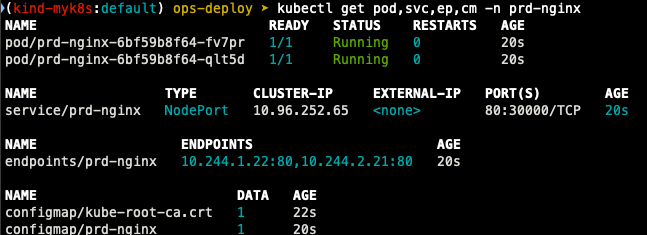
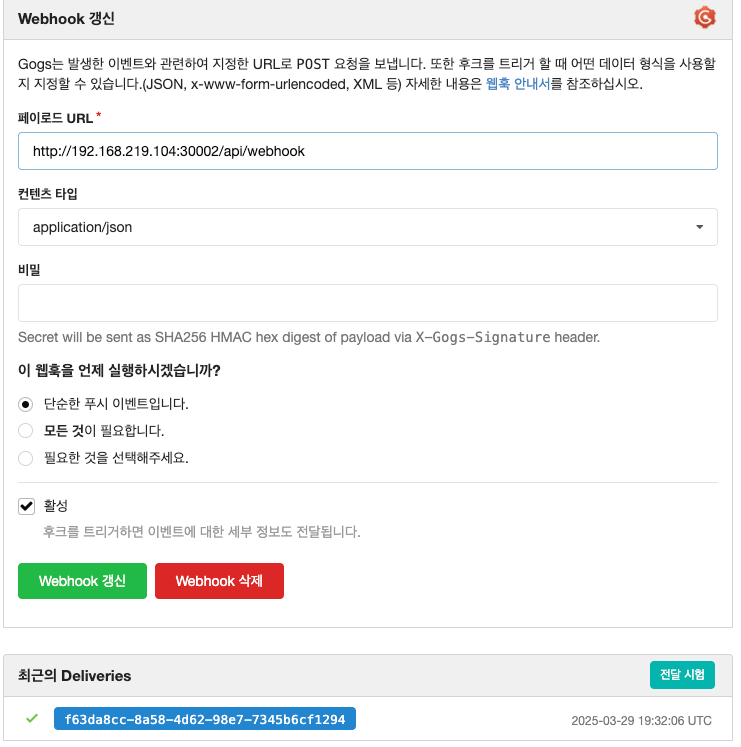
Repo(ops-deploy) 에 Webhook 를 통해 Argo CD 에 즉시 반영 trigger하여 k8s 배포 할 수 있게 설정
Repo(ops-deploy) 에 webhooks 설정 : Gogs 선택
- dev-nginx argocd app 생성
cat <<EOF | kubectl apply -f -
apiVersion: argoproj.io/v1alpha1
kind: Application
metadata:
name: dev-nginx
namespace: argocd
finalizers:
- resources-finalizer.argocd.argoproj.io
spec:
project: default
source:
helm:
valueFiles:
- values-dev.yaml
path: nginx-chart
repoURL: http://$MyIP:3000/devops/ops-deploy
targetRevision: HEAD
syncPolicy:
automated:
prune: true
syncOptions:
- CreateNamespace=true
destination:
namespace: dev-nginx
server: https://kubernetes.default.svc
EOF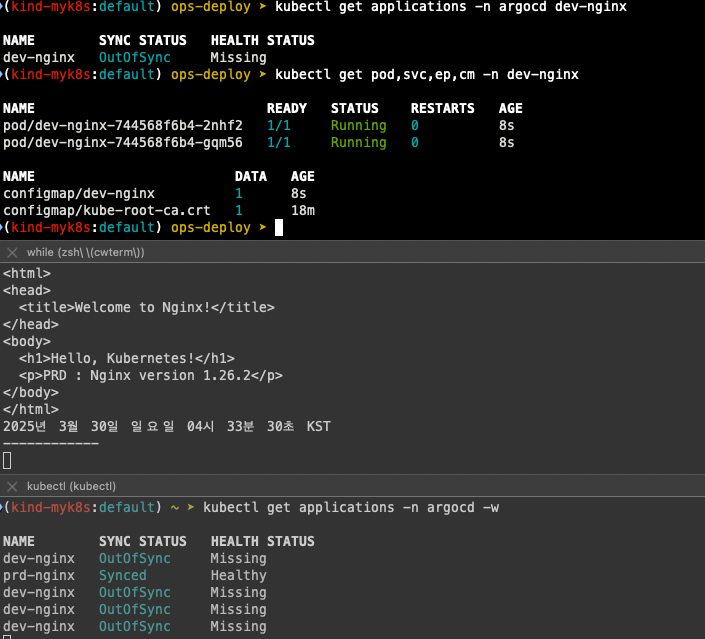
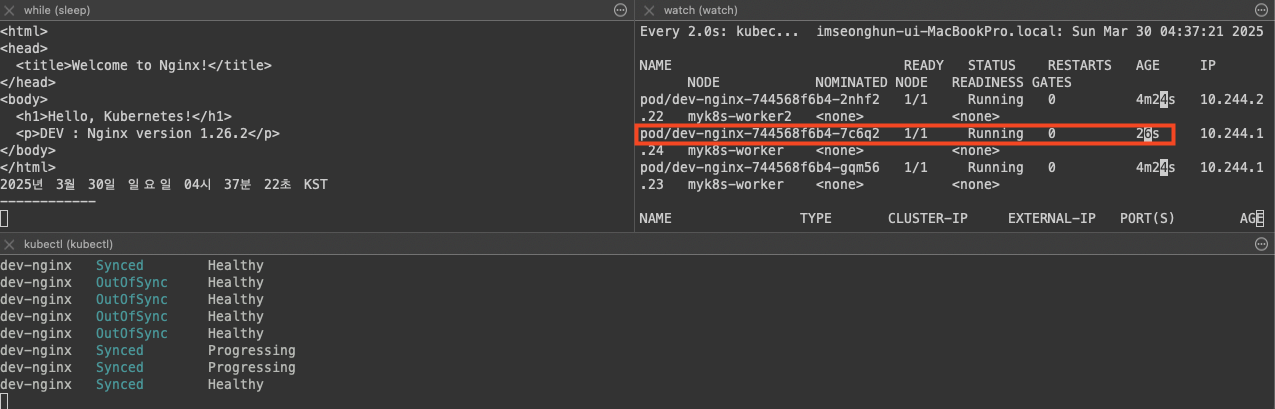
- git 수정 후 argocd 즉시 반영 확인
#
cd cicd-labs/ops-deploy/nginx-chart
#
sed -i -e "s|replicaCount: 2|replicaCount: 3|g" values-dev.yaml
git add values-dev.yaml && git commit -m "Modify nginx-chart : values-dev.yaml" && git push -u origin main
watch -d kubectl get all -n dev-nginx -o wide
#
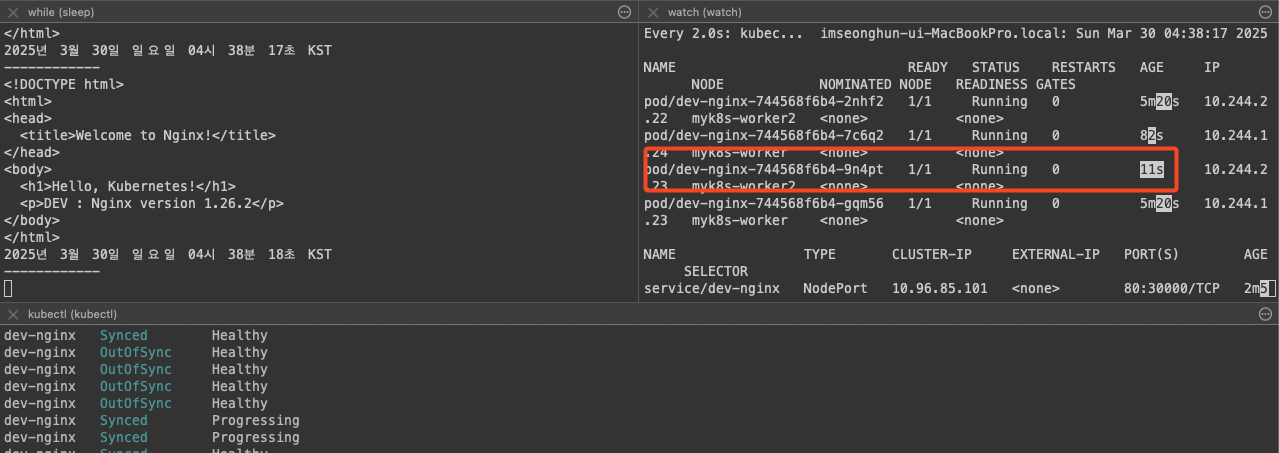
sed -i -e "s|replicaCount: 3|replicaCount: 4|g" values-dev.yaml
git add values-dev.yaml && git commit -m "Modify nginx-chart : values-dev.yaml" && git push -u origin main
watch -d kubectl get all -n dev-nginx -o wide
#
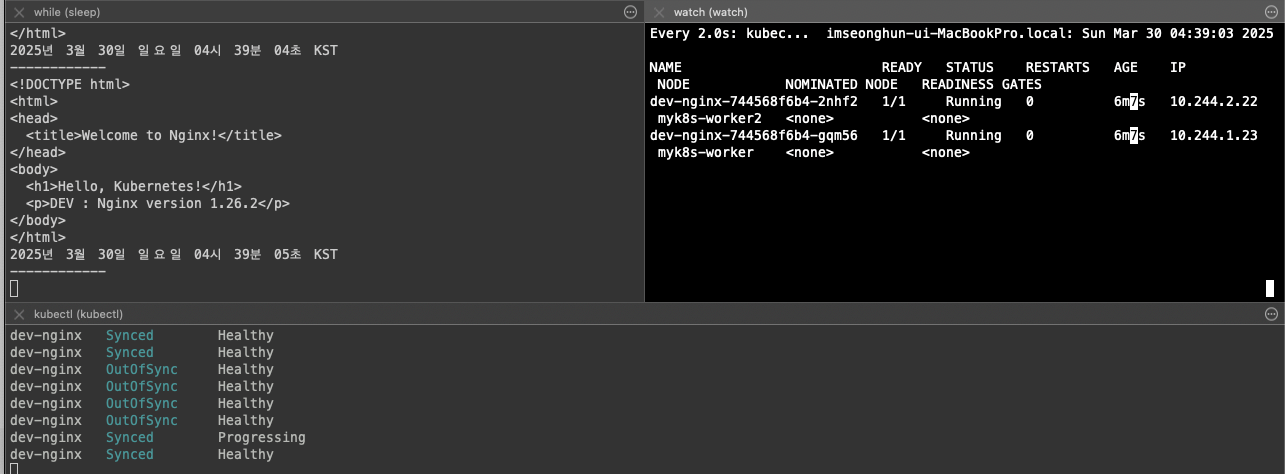
sed -i -e "s|replicaCount: 4|replicaCount: 2|g" values-dev.yaml
git add values-dev.yaml && git commit -m "Modify nginx-chart : values-dev.yaml" && git push -u origin main
watch -d kubectl get all -n dev-nginx -o wide
1) replica 2 -> 3
2) replica 3 -> 4
3) replica 4 -> 2
Jenkins CI + Argo CD + K8S(Kind)
- ops-deploy 기본 작업
## 경로 이동
cd ops-deploy
## 디렉토리 생성
mkdir dev-app
## 도커 계정 정보
DHUSER=<docker user>
## 버전 정보
VERISON=0.0.1
## VERSION 파일 생성
cat > dev-app/VERSION <<EOF
$VERSION
EOF
## deploy,svc 파일 생성
cat > dev-app/timeserver.yaml <<EOF
apiVersion: apps/v1
kind: Deployment
metadata:
name: timeserver
spec:
replicas: 2
selector:
matchLabels:
pod: timeserver-pod
template:
metadata:
labels:
pod: timeserver-pod
spec:
containers:
- name: timeserver-container
image: docker.io/$DHUSER/dev-app:$VERSION
livenessProbe:
initialDelaySeconds: 30
periodSeconds: 30
httpGet:
path: /healthz
port: 80
scheme: HTTP
timeoutSeconds: 5
failureThreshold: 3
successThreshold: 1
imagePullSecrests:
- name: dockerhub-secret
EOF
cat > dev-app/service.yaml <<EOF
apiVersion: v1
kind: Service
metadata:
name: timeserver
spec:
selector:
pod: timeserver-pod
ports:
- port: 80
targetPort: 80
protocol: TCP
nodePort: 30000
type: NodePort
EOF
## 배포
git add . && git commit -m "Add dev-app deployment yaml" && git push -u origin main
- ops-deploy를 바라보는 ArgoCD 생성
## 변수 확인
echo $MyIP
## argo app 생성
cat <<EOF | kubectl apply -f -
apiVersion: argoproj.io/v1alpha1
kind: Application
metadata:
name: timeserver
namespace: argocd
finalizers:
- resources-finalizer.argocd.argoproj.io
spec:
project: default
source:
path: dev-app
repoURL: http://$MyIP:3000/devops/ops-deploy
targetRevision: HEAD
syncPolicy:
automated:
prune: true
syncOptions:
- CreateNamespace=true
destination:
namespace: default
server: https://kubernetes.default.svc
EOF
## 확인
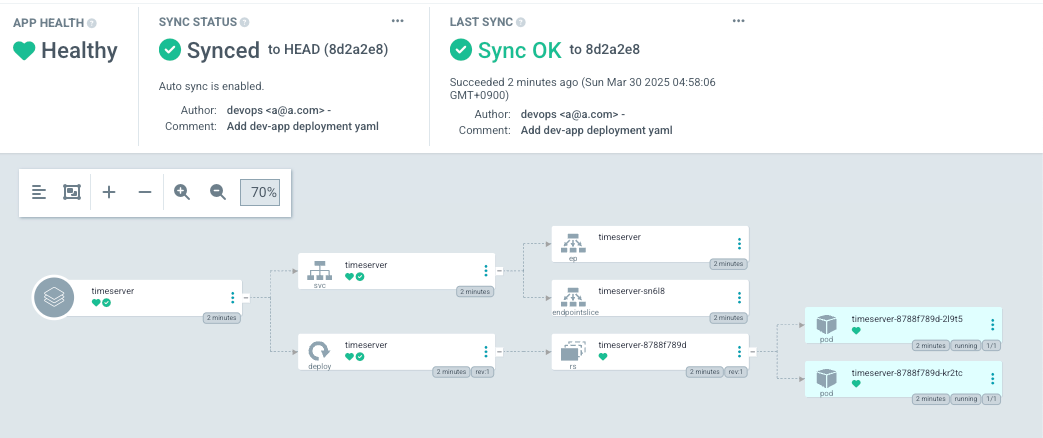
k get application -n argocd timeserver
k get application -n argocd timeserver | k neat
k get deploy,rs,pod
## 접속 테스트
curl http://127.0.0.1:30000
curl http://127.0.0.1:30000/healthz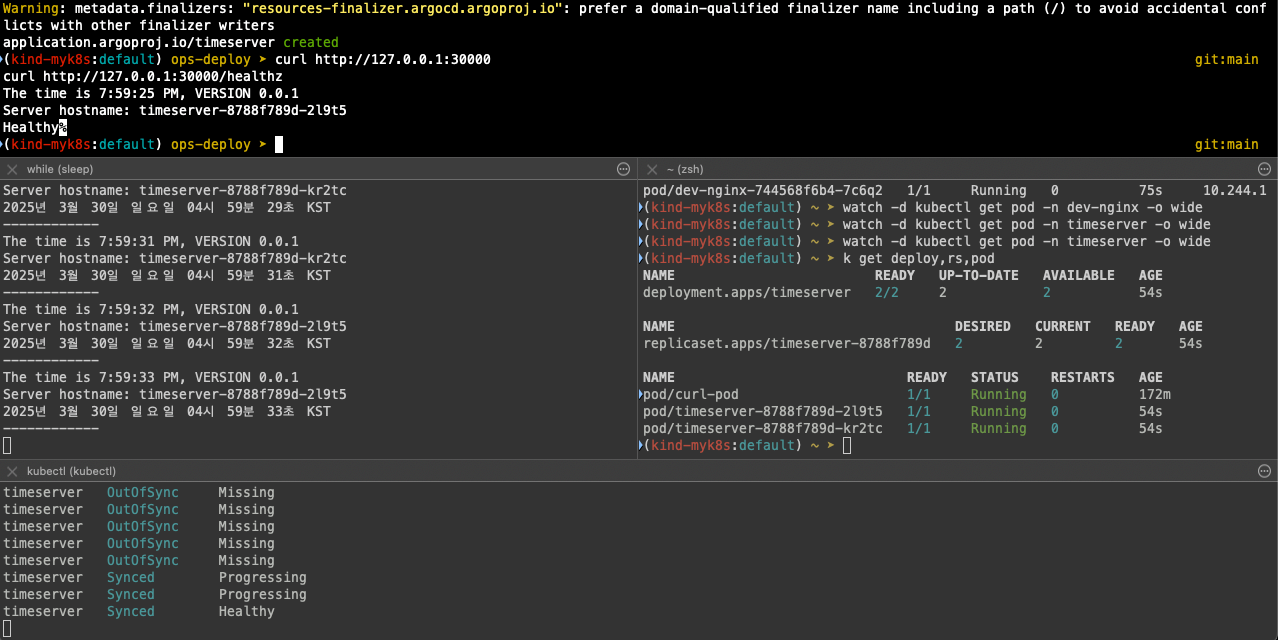
- dev-app 설정
- dev-app Repo에 VERSION 업데이트 시 → ops-deploy Repo 에 dev-app 에 파일에 버전 정보 업데이트 작업 추가
1. 기존 버전 정보는 VERSION 파일 내에 정보를 가져와서 변수 지정 : OLDVER=$(cat dev-app/VERSION)
2. 신규 버전 정보는 environment 도커 태그 정보를 가져와서 변수 지정 : NEWVER=$(echo ${DOCKER_TAG})
3. 이후 sed 로 ops-deploy Repo 에 dev-app/VERSION, timeserver.yaml 2개 파일에 ‘기존 버전’
→ ‘신규 버전’으로 값 변경
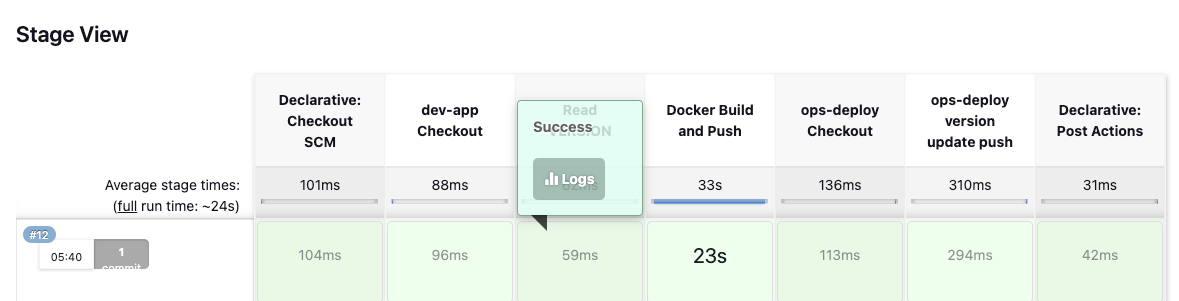
4. 이후 ops-deploy Repo 에 git push ⇒ Argo CD App Trigger 후 AutoSync 로 신규 버전 업데이트 진행 - Jenkinsfilt 수정 (SCM-Pipeline)
pipeline {
agent any
environment {
DOCKER_IMAGE = '<자신의 도커 허브 계정>/dev-app' // Docker 이미지 이름
GOGSCRD = credentials('gogs-crd')
}
stages {
stage('dev-app Checkout') {
steps {
git branch: 'main',
url: 'http://<자신의 집 IP>:3000/devops/dev-app.git', // Git에서 코드 체크아웃
credentialsId: 'gogs-crd' // Credentials ID
}
}
stage('Read VERSION') {
steps {
script {
// VERSION 파일 읽기
def version = readFile('VERSION').trim()
echo "Version found: ${version}"
// 환경 변수 설정
env.DOCKER_TAG = version
}
}
}
stage('Docker Build and Push') {
steps {
script {
docker.withRegistry('https://index.docker.io/v1/', 'dockerhub-crd') {
// DOCKER_TAG 사용
def appImage = docker.build("${DOCKER_IMAGE}:${DOCKER_TAG}")
appImage.push()
appImage.push("latest")
}
}
}
}
stage('ops-deploy Checkout') {
steps {
git branch: 'main',
url: 'http://<자신의 집 IP>:3000/devops/ops-deploy.git', // Git에서 코드 체크아웃
credentialsId: 'gogs-crd' // Credentials ID
}
}
stage('ops-deploy version update push') {
steps {
sh '''
OLDVER=$(cat dev-app/VERSION)
NEWVER=$(echo ${DOCKER_TAG})
sed -i "s/$OLDVER/$NEWVER/" dev-app/timeserver.yaml
sed -i "s/$OLDVER/$NEWVER/" dev-app/VERSION
git add ./dev-app
git config user.name "devops"
git config user.email "a@a.com"
git commit -m "version update ${DOCKER_TAG}"
git push http://${GOGSCRD_USR}:${GOGSCRD_PSW}@<자신의 집 IP>:3000/devops/ops-deploy.git
'''
}
}
}
post {
success {
echo "Docker image ${DOCKER_IMAGE}:${DOCKER_TAG} has been built and pushed successfully!"
}
failure {
echo "Pipeline failed. Please check the logs."
}
}
}- dev-app 에서 git push 수행
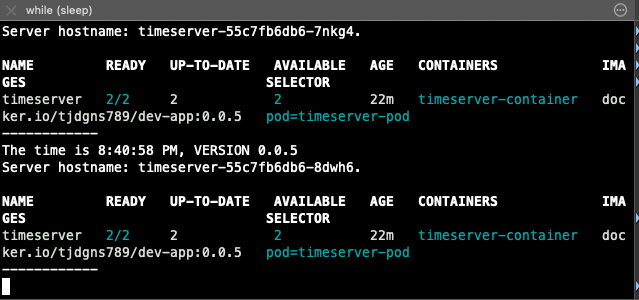
## 반복 동작 확인
while true; do curl -s --connect-timeout 1 http://127.0.0.1:30000 ; echo ; kubectl get deploy timeserver -owide; echo "------------" ; sleep 1 ; done
# VERSION 파일 수정 : 0.0.5
# server.py 파일 수정 : 0.0.5
git add . && git commit -m "VERSION $(cat VERSION) Changed" && git push -u origin main
Argo Rollout
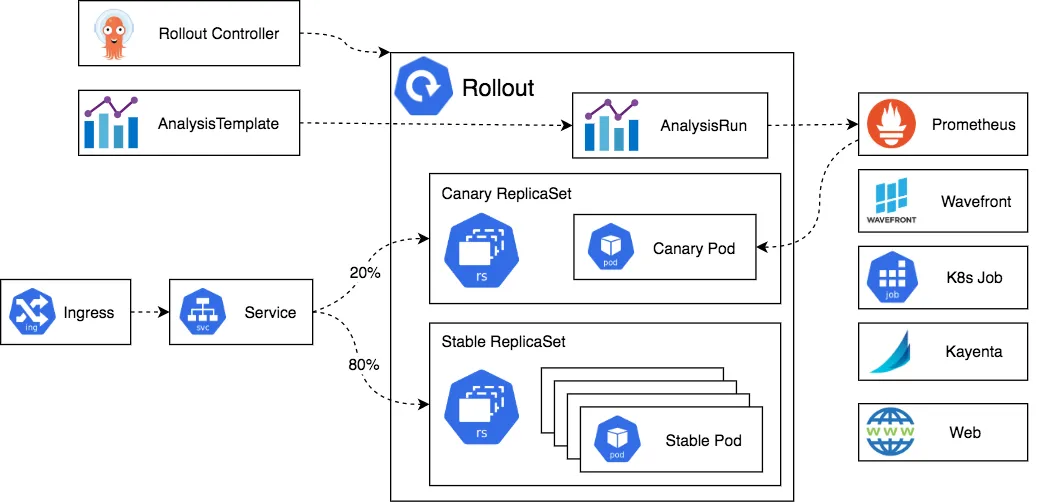
CRD를 통해 Kubernetes에 Blue-Green, Canary, 잗동 롤백/승력, 트래픽 분산을 추가
장점
- 기존 rollingupdate의 한계 해결
- 트래픽 흐름 제어
- 외부 메트릭 기반 검증
- 자동 롤백
- 출시 속도 조절
기능
- Blue-Green, Canary 배포 전략
- 가중치 기반 트래픽 전환
- 자동 롤백 및 승격
- 사용자 정의 메트릭 분석 및 외부 모니터링 도구와 통합
- Ingress Controller 및 Service Mesh 통합 (NGINX, ALB, Istio 등)
Argo Rollout 설치
# 네임스페이스 생성 및 파라미터 파일 작성
cd cicd-labs
kubectl create ns argo-rollouts
cat <<EOT > argorollouts-values.yaml
dashboard:
enabled: true
service:
type: NodePort
nodePort: 30003
EOT
# 설치: 2.35.1
helm install argo-rollouts argo/argo-rollouts --version 2.39.2 -f argorollouts-values.yaml --namespace argo-rollouts
# 확인
kubectl get all -n argo-rollouts
kubectl get crds
# 접속
open "http://127.0.0.1:30003"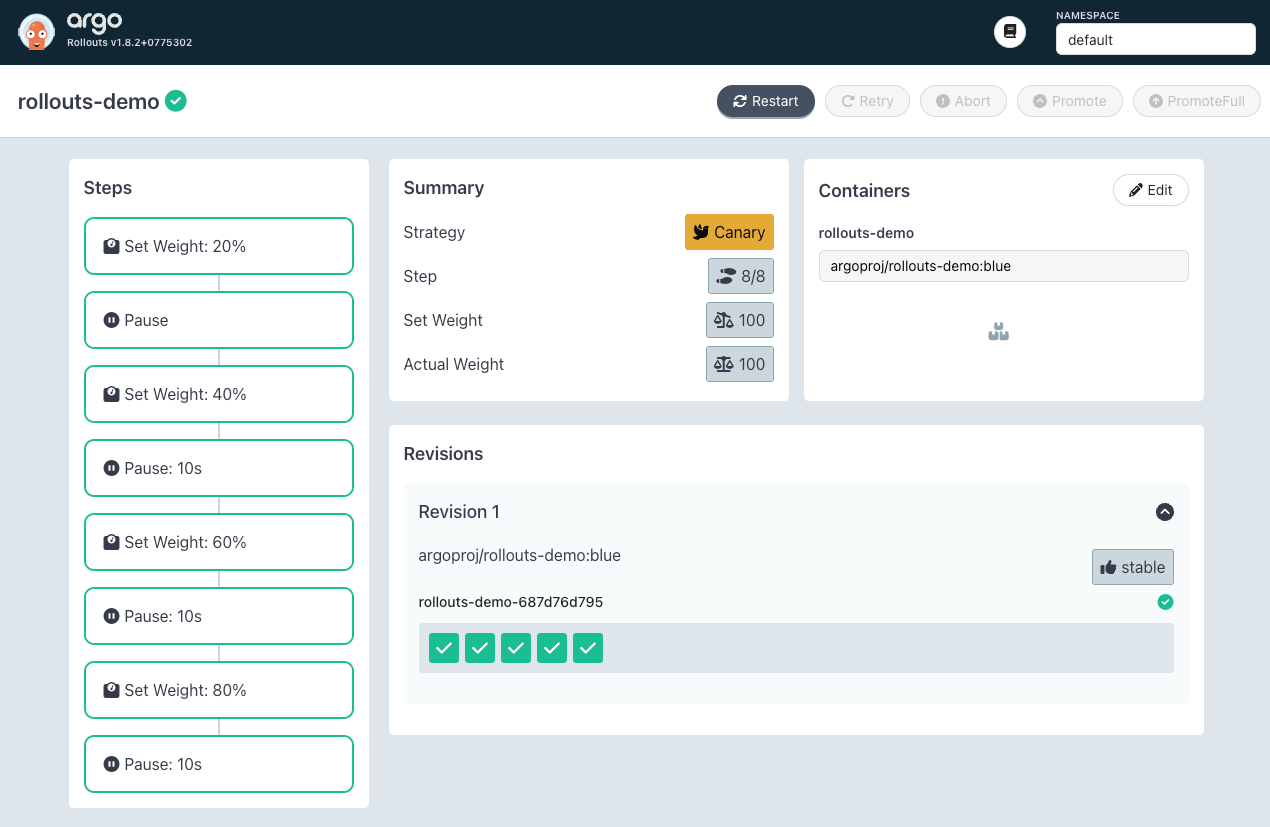
# 다음 명령을 실행하여 초기 롤아웃 및 서비스를 배포합니다:
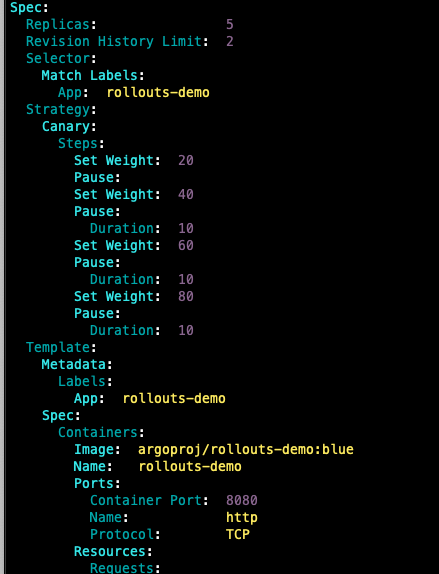
kubectl apply -f https://raw.githubusercontent.com/argoproj/argo-rollouts/master/docs/getting-started/basic/rollout.yaml
kubectl apply -f https://raw.githubusercontent.com/argoproj/argo-rollouts/master/docs/getting-started/basic/service.yaml
# 확인
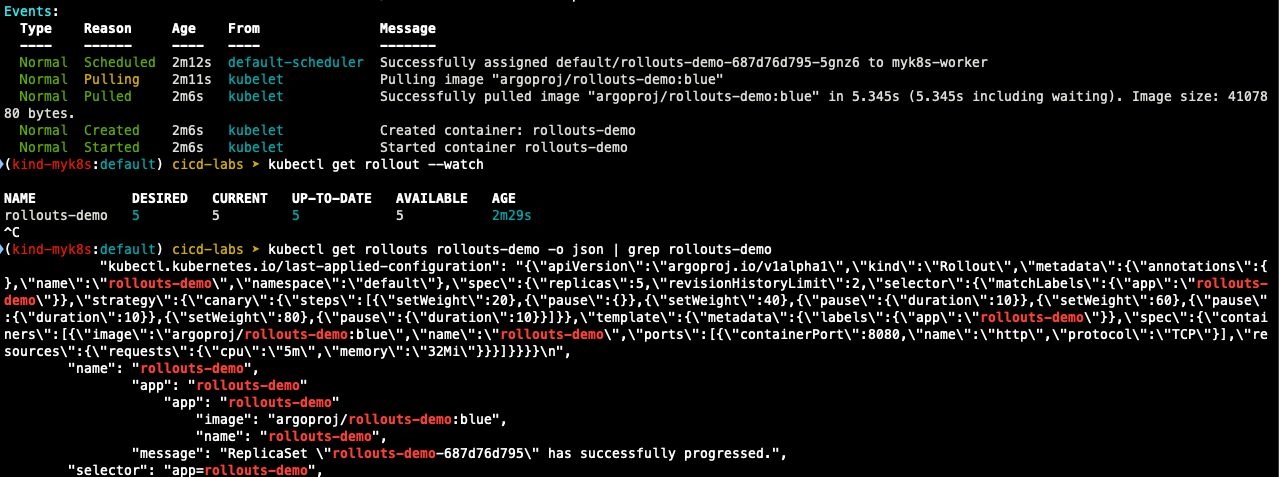
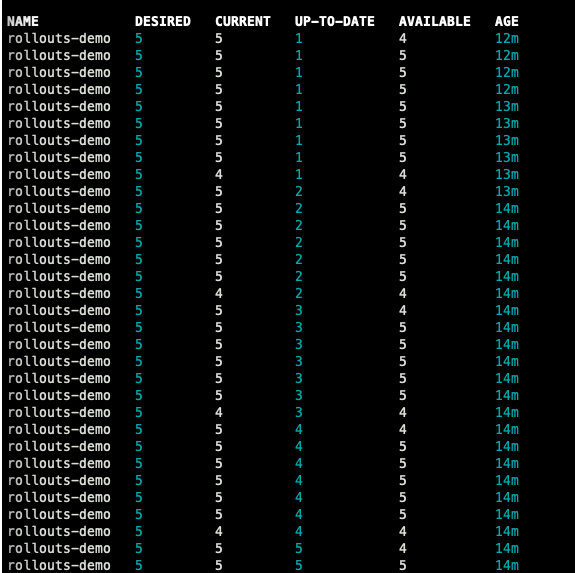
kubectl get rollout --watch
kubectl get rollout
kubectl describe rollout
kubectl get pod -l app=rollouts-demo
kubectl get svc,ep rollouts-demo
kubectl get rollouts rollouts-demo -o json | grep rollouts-demo
...
"image": "argoproj/rollouts-demo:blue"
...
- update rollout
kubectl edit rollouts rollouts-demo
## 이미지를 blue에서 yellow로 변경
- image: argoproj/rollouts-demo:blue >> - image: argoproj/rollouts-demo:yellow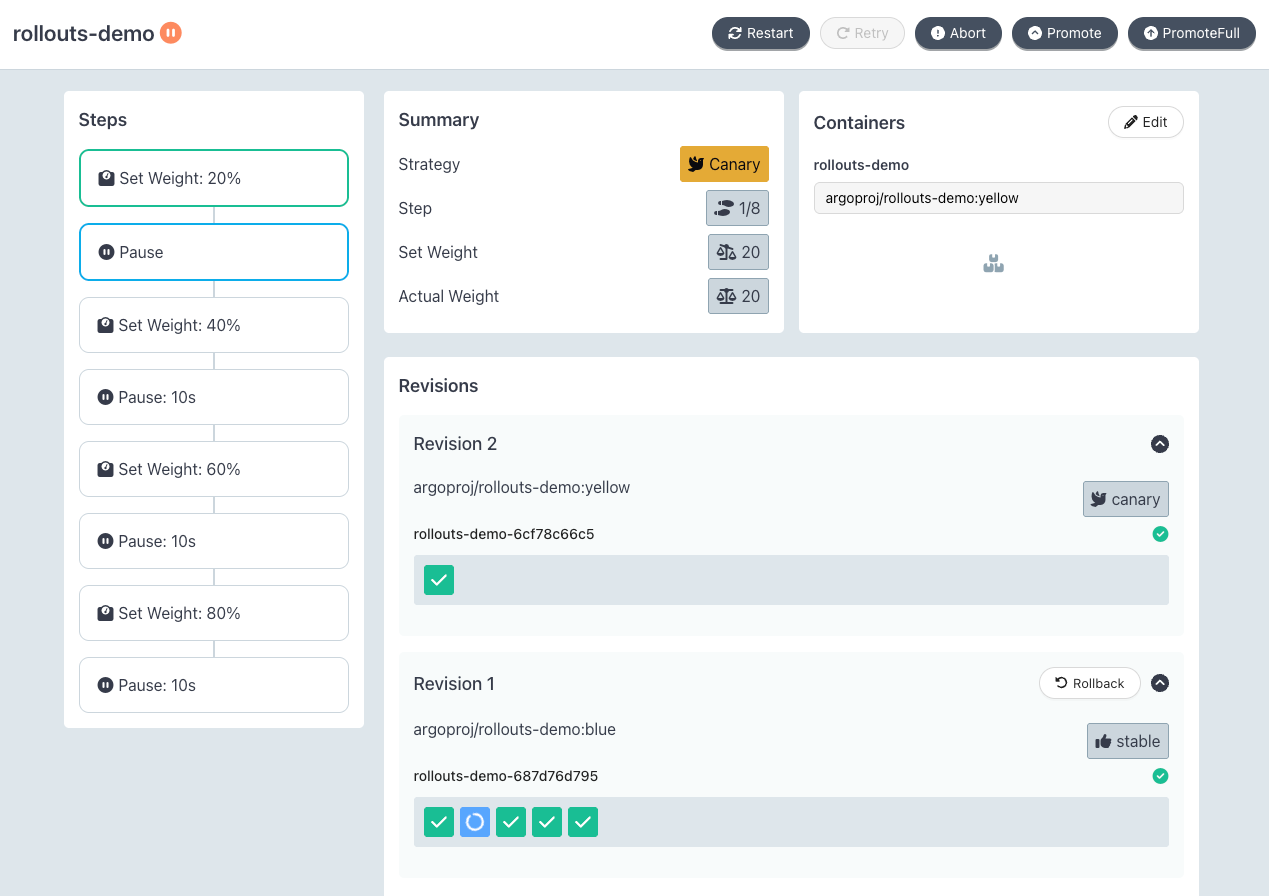
- Promoting a Rollout
promote 명령을 실행하여 yellow 이미지의 서비스를 운영으로 승격
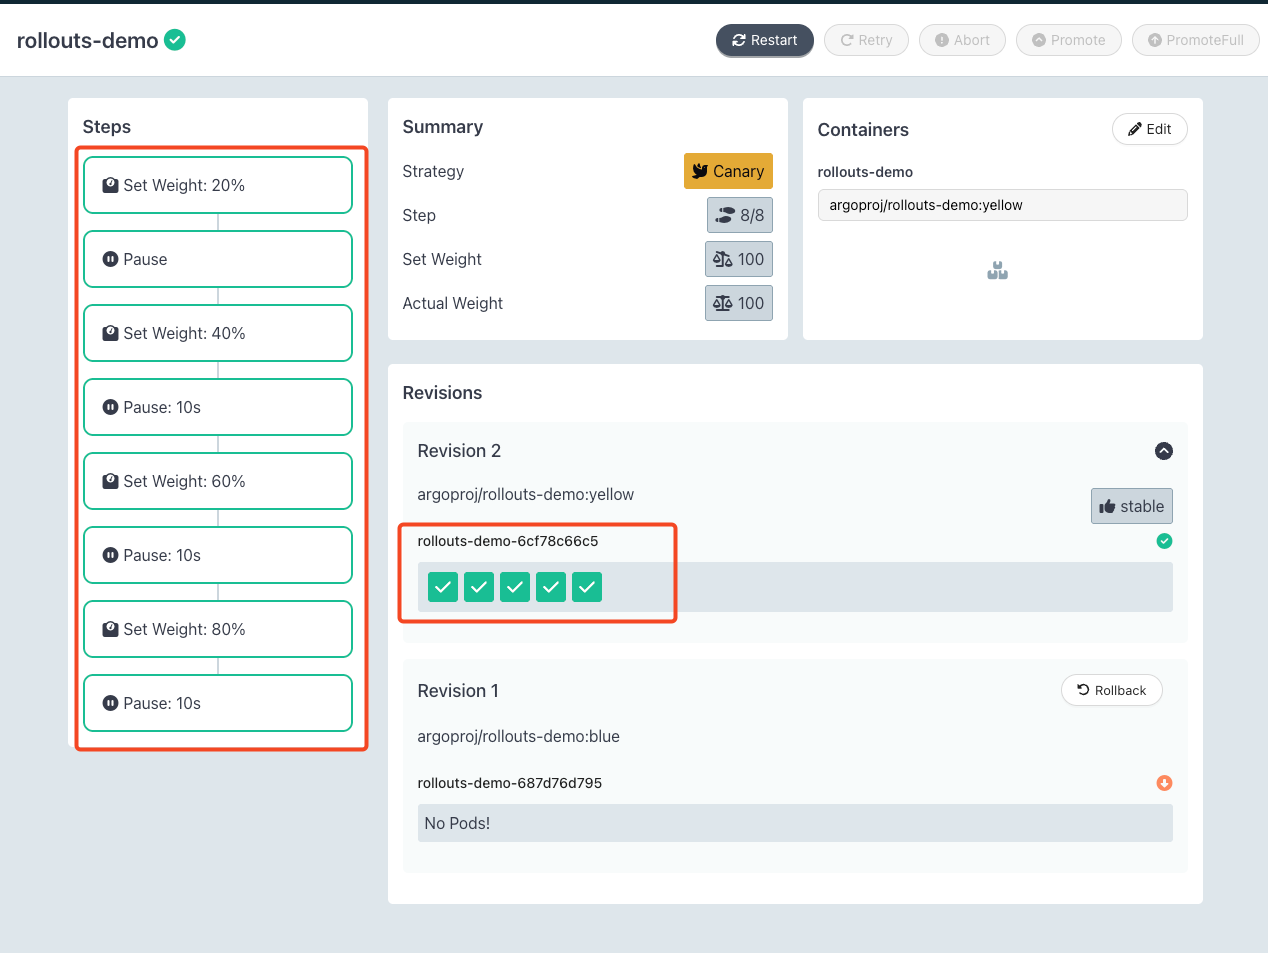

아래 youtube와 같이 테스트 페이지를 통해 트래픽이 blue > green으로 변경되는 것을 시각적으로 확인도 가능합니다.
'Cloud > Kubernetes' 카테고리의 다른 글
| [KANS] AWS EKS : VPC CNI (4) | 2024.11.03 |
|---|---|
| [KANS] Cilium + eBPF (2) (2) | 2024.10.27 |
| [KANS] Cilium & Hubble (0) | 2024.10.26 |
| [KANS] Istio - Traffic Management (0) | 2024.10.20 |
| [KANS] Istio example (bookinfo) (1) | 2024.10.20 |
목표 구성도
실습 환경
- 인프라 : 로컬 PC
- 클러스터 : kind Cluster
- SW : Jenkins, Gogs, kind(k8s)
Jenkins, gogs 컨테이너 배포 (docker-compose)
## 작업 디릭토리 생성
mkdir cicd-labs
cd cicd-labs
## Jenkins, Gogs 배포
cat <<EOT > docker-compose.yaml
services:
jenkins:
container_name: jenkins
image: jenkins/jenkins
restart: unless-stopped
networks:
- cicd-network
ports:
- "8080:8080"
- "50000:50000"
volumes:
- /var/run/docker.sock:/var/run/docker.sock
- jenkins_home:/var/jenkins_home
gogs:
container_name: gogs
image: gogs/gogs
restart: unless-stopped
networks:
- cicd-network
ports:
- "10022:22"
- "3000:3000"
volumes:
- gogs-data:/data
volumes:
jenkins_home:
gogs-data:
networks:
cicd-network:
driver: bridge
EOT
docker compose up -d
docker compose ps
## 기본 정보 확인
for i in gogs jenkins ; do echo ">> container : $i <<"; docker compose exec $i sh -c "whoami && pwd"; echo; done
## 도커를 이용하여 각 컨테이너로 접속
docker compose exec jenkins bash
docker compose exec gogs bash
Jenkins 컨테이너 초기 설정
## Jenkins 초기 암호 확인
docker compose exec jenkins cat /var/jenkins_home/secrets/initialAdminPassword
## Jekins 웹 접속 주소 확인 admin / qwe123
open "http://127.0.0.1:8080"
## 로그 확인
docker compose logs jenkins -f
- Jenkins URL 설정
- Jenkins 컨테이너에서 호스트 도커 데몬 사용 설정 (Docker out of Docker) - Jenkins 컨테이너 내부에서 로컬 PC의 Docker 사용
## Jenkins 컨테이너 내부에 도커 실행 파일 설치
docker compose exec --privileged -u root jenkins bash
root@42b97c5684fd:/# id
uid=0(root) gid=0(root) groups=0(root)
## jenkins 컨테이너 내부에서 root가 아닌 jenkins 유저도 docker를 실행할 수 있도록 권한을 부여
groupadd -g 2000 -f docker
chgrp docker /var/run/docker.sock
ls -l /var/run/docker.sock
usermod -aG docker jenkins
cat /etc/group | grep docker
exit
## 변경된 권한 적용을 위해 컨테이너 재실행
docker compose restart jenkins
## jenkins user로 docker 명령어 실행 확인
docker compose exec jenkins id
docker compose exec jenkins docker info
docker compose exec jenkins docker ps
gogs 컨테이너 초기 실행
- 웹 페이지 접속 : http://127.0.0.1:3000/install
초기 설정 진행
- 데이터베이스 유형 : SQLite3
- 어플리케이션 URl : http://<로컬 PC IP>:3000/
- 기본 브랜치 : main
- 관리자 계정 설정 클릭 : 이름(계정명 - 닉네임 사용 devops), 비밀번호(qwe123)
- [Token 생성] 로그인 > your settings > applications : generate new token - token name(devops) => generate token 클릭 : 메모하기
- repo 생성
- repo-1 : 개발팀 용
- repo name : dev-app
- visibility : (check) this repository is private
- .gitignore : Python
- Readme : Default
- repo-2 : 데브옵스팀 용
- repo. name : ops-deploy
- visibility : (check) this repository is private
- .gitignore : Python
- Readme : Default
- repo-1 : 개발팀 용
gogs 실습을 위한 저장소 설정
## 현재 설정 저장소 리스트 확인
git config --list --show-origin
## 환경 변수 설정
TOKEN=<gogs token>
MyIP=<Local PC IP>
## dev-app 레포 clone
git clone http://devops:$TOKEN@$MyIP:3000/devops/dev-app.git
cd dev-app
git --no-pager config --local --list
git config --local user.name "devops"
git config --local user.email "a@a.com"
git config --local init.defaultBranch main
git config --local credential.helper store
git --no-pager config --local --list
cat .git/config
#
git --no-pager branch
git remote -v
- server.py 파일 작성
cat > server.py <<EOF
from http.server import ThreadingHTTPServer, BaseHTTPRequestHandler
from datetime import datetime
import socket
class RequestHandler(BaseHTTPRequestHandler):
def do_GET(self):
match self.path:
case '/':
now = datetime.now()
hostname = socket.gethostname()
response_string = now.strftime("The time is %-I:%M:%S %p, VERSION 0.0.1\n")
response_string += f"Server hostname: {hostname}\n"
self.respond_with(200, response_string)
case '/healthz':
self.respond_with(200, "Healthy")
case _:
self.respond_with(404, "Not Found")
def respond_with(self, status_code: int, content: str) -> None:
self.send_response(status_code)
self.send_header('Content-type', 'text/plain')
self.end_headers()
self.wfile.write(bytes(content, "utf-8"))
def startServer():
try:
server = ThreadingHTTPServer(('', 80), RequestHandler)
print("Listening on " + ":".join(map(str, server.server_address)))
server.serve_forever()
except KeyboardInterrupt:
server.shutdown()
if __name__== "__main__":
startServer()
EOF
## 실행 테스트
python3 server.py
curl localhost
curl localhost/healthz
## Dockerfile 생성
cat > Dockerfile <<EOF
FROM python:3.12
ENV PYTHONUNBUFFEREED 1
COPY . /app
WORKDIR /app
CMD python3 server.py
EOF
## Version 파일 생성
echo "0.0.1" > VERSION
## 레포 배포
git status
git add .
git commit -m "add dev-app"
git push -u origin main
- App Version 예시
- Docker hub repo 생성 및 토큰 발급
Jenkins CI + K8S (Kind)
- kind 및 툴 설치
## kind 설치
brew install kind
kind --version
## install kubectl
brew install kubernetes-cli
k version --client=true
## 단축키 설정
echo "alias kubectl=kubecolor" >> ~/.zshrc
## Install Helm
brew install helm
helm version
## 유용한 툴 설치
brew install krew
brew install kube-ps1
brew install kubectx
## kubectl 출력 시 하이라이트
brew install kubecolor
echo "alias kubectl=kubecolor" >> ~/.zshrc
echo "compdef kubecolor=kubectl" >> ~/.zshrc
k krew install install neat stren
- Cluster 배포
## Docker 컨테이너 확인
docker ps
## cicd-labs 경로에서 파일 생성
cat > kind-3node.yaml <<EOF
kind: Cluster
apiVersion: kind.x-k8s.io/v1alpha4
networking:
apiServerAddress: "$MyIP"
nodes:
- role: control-plane
extraPortMappings:
- containerPort: 30000
hostPort: 30000
- containerPort: 30001
hostPort: 30001
- containerPort: 30002
hostPort: 30002
- containerPort: 30003
hostPort: 30003
- role: worker
- role: worker
EOF
## cluster 생성
kind create cluster --config kind-3node.yaml --name myk8s --image kindest/node:v1.32.2
## 확인
kind get nodes --name myk8s
kubens default
## kind 는 별도 도커 네트워크 생성 후 사용
docker network ls
docker inspect kind | jq
## k8s api 주소 확ㄷ인
k cluster-info
(kind는 자체 cni인 kindnet을 사용함)
- kube-ops-view 설치
helm repo add geek-cookbook https://geek-cookbook.github.io/charts/
helm install kube-ops-view geek-cookbook/kube-ops-view --version 1.2.2 --set service.main.type=NodePort,service.main.ports.http.nodePort=30001 --set env.TZ="Asia/Seoul" --namespace kube-system
## 설치 확인
k get deploy,pod,svc,ep -n kube-system -l app.kubernetes.io/instance=kube-ops-view
## kube-ops-view 접속
open "http://127.0.0.1:30001/#scale=1.5"
- Jenkins 설정 : Plugin 설치, 자격증명 설정
- Jenkins plugin 설치
- pipeline stage view
- docker pipeline
- gogs
- 자격증명 설정 : Jenkins 관리 -> Credentials -> Globals -> Add credentials
- Gogs Repo 자격증명 설정 : gogs-crd
- kind. : Username with password
- Username : devops
- Password : <Gogs Token>
- ID : gogs-crd
- Docker Hub 자격증명 설정 : gogs-crd
- kind : Username with password
- Username : <Docker username>
- password : <Docker Token or password>
- ID : dockerhub-crd
- k8s 자격증명 설정 : k8s-crd
- kind : Secret file
- file : kubeconfig 파일 업로드
- ID : k8s-crd
- Gogs Repo 자격증명 설정 : gogs-crd
- Jekins Item 생성(pipeline)
- name : jenkins-ci
## pipeline 내용
pipeline {
    agent any
    environment {
        DOCKER_IMAGE = '<자신의 도커 허브 계정>/dev-app' // Docker 이미지 이름
    }
    stages {
        stage('Checkout') {
            steps {
                 git branch: 'main',
                 url: 'http://<자신의 집 IP>:3000/devops/dev-app.git',  // Git에서 코드 체크아웃
                 credentialsId: 'gogs-crd'  // Credentials ID
            }
        }
        stage('Read VERSION') {
            steps {
                script {
                    // VERSION 파일 읽기
                    def version = readFile('VERSION').trim()
                    echo "Version found: ${version}"
                    // 환경 변수 설정
                    env.DOCKER_TAG = version
                }
            }
        }
        stage('Docker Build and Push') {
            steps {
                script {
                    docker.withRegistry('https://index.docker.io/v1/', 'dockerhub-crd') {
                        // DOCKER_TAG 사용
                        def appImage = docker.build("${DOCKER_IMAGE}:${DOCKER_TAG}")
                        appImage.push()
                        appImage.push("latest")
                    }
                }
            }
        }
    }
    post {
        success {
            echo "Docker image ${DOCKER_IMAGE}:${DOCKER_TAG} has been built and pushed successfully!"
        }
        failure {
            echo "Pipeline failed. Please check the logs."
        }
    }
}
- Item 생성 후 빌드 실행 후 확인
K8S에 어플리케이션 배포하기
# 디플로이먼트 오브젝트 배포 : 리플리카(파드 2개), 컨테이너 이미지 >> 아래 도커 계정 부분만 변경해서 배포해보자
DHUSER=<도커 허브 계정명>
DHUSER=tjdgns789
cat <<EOF | kubectl apply -f -
apiVersion: apps/v1
kind: Deployment
metadata:
name: timeserver
spec:
replicas: 2
selector:
matchLabels:
pod: timeserver-pod
template:
metadata:
labels:
pod: timeserver-pod
spec:
containers:
- name: timeserver-container
image: docker.io/$DHUSER/dev-app:0.0.1
livenessProbe:
initialDelaySeconds: 30
periodSeconds: 30
httpGet:
path: /healthz
port: 80
scheme: HTTP
timeoutSeconds: 5
failureThreshold: 3
successThreshold: 1
EOF
watch -d kubectl get deploy,rs,pod -o wide
# 배포 상태 확인 : kube-ops-view 웹 확인
kubectl get events -w --sort-by '.lastTimestamp'
kubectl get deploy,pod -o wide
kubectl describe pod
레포에 접근 권한 문제로 Access Denied 오류가 발생하면서 파드 배포가 실패한다.
- secret 설정
DHUSER=<도커 허브 계정>
DHPASS=<도커 허브 암호 혹은 토큰>
echo $DHUSER $DHPASS
kubectl create secret docker-registry dockerhub-secret \
--docker-server=https://index.docker.io/v1/ \
--docker-username=$DHUSER \
--docker-password=$DHPASS
# 확인
kubectl get secret
kubectl describe secret
kubectl get secrets -o yaml | kubectl neat # base64 인코딩 확인
- 파드 재배포
cat <<EOF | kubectl apply -f -
apiVersion: apps/v1
kind: Deployment
metadata:
name: timeserver
spec:
replicas: 2
selector:
matchLabels:
pod: timeserver-pod
template:
metadata:
labels:
pod: timeserver-pod
spec:
containers:
- name: timeserver-container
image: docker.io/$DHUSER/dev-app:0.0.1
livenessProbe:
initialDelaySeconds: 30
periodSeconds: 30
httpGet:
path: /healthz
port: 80
scheme: HTTP
timeoutSeconds: 5
failureThreshold: 3
successThreshold: 1
imagePullSecrets:
- name: dockerhub-secret
EOF
- yaml 파일을 수정해서 apply 하는 방법이 일방적이지만 실습에서는 edit으로 수정한 후 rollout을 통해 재배포했다.
## pod 테스트를 위한 curl 파드 생성
k run curl-pod --image=curlimages/curl:latest --command -- sh -c "while true; do sleep 3600; done"
k get pod -o wide
## timeserver 파드 p 1개 확인 후 접속 확인
PODIP1=<timeserver ip>
k exec -it curl-pod --curl $PODIP1
k exec -it curl-pod --curl $PODIP1/healthz
## logs 확인
k logs deploy/timeserver
k stern deploy/timeserver
- 서비스 생성
cat <<EOF | kubectl apply -f -
apiVersion: v1
kind: Service
metadata:
name: timeserver
spec:
selector:
pod: timeserver-pod
ports:
- port: 80
targetPort: 80
protocol: TCP
nodePort: 30000
type: NodePort
EOF
## 생성 확인
k get svc,ep timeserver -o wide
## 접속 테스트
k exec -it curl-pod -- curl timeserver
k exec -it curl-pod -- curl timeserver/healthz
curl http://127.0.0.1:3000
## 분산 테스트
for i in {1..100}; do curl -s http://127.0.0.1:30000 | grep name; done | sort | uniq -c | sort -nr
## 파드 증설
k scale deploy timeserver --replicas 4
## 분산 테스트
for i in {1..100}; do curl -s http://127.0.0.1:30000 | grep name; done | sort | uniq -c | sort -nr
- 코드 업데이트 후 재배포
## VERSION 변경 : 0.0.2
## server.py : 0.0.2
git add . && git commit -m "Version $(cat VERSION) Changed" && git push -u origin main
- commit 확인
## 파드 변경
while true; do curl -s --connect-timeout 1 http://127.0.0.1:30000 ; sleep 1 ; done
## 이미지 변경
k set image deployment timeserver timeserver-container=$DHUSER/dev-app:0.0.Y && watch -d "kubectl get deploy,ep timeserver; echo; kubectl get rs,pod"
## 모니터링
watch -d kubectl get deploy,rs,pod,svc,ep -o wide
## 접속 테스트
curl http://127.0.0.1:30000
gogs webhooks 설정
- gogs 설정 파일 수정
# 경로 : /data/gogs/conf/app.ini
[security]
INSTALL_LOCK = true
SECRET_KEY = PbNNZNR7Lg1Zr4z
## 아래 라인 추가 : 로컬 PC IP
LOCAL_NETWORK_ALLOWLIST = 192.168.219.104
## 컨테이너 재시작
docker compose restart gogs
gogs > dev-app repo > settings > webhooks 에서 생성
- Jenkins Item 생성
- item name : SCM-Pipeline
- github project : <dev-app repo url>
- user gogs secret : qwe123
- triggers : Build when a change is pushed to Gogs (check)
- Pipeline script from SCM
- jenkins 파일 생성
# Jenkinsfile 빈 파일 작성
touch Jenkinsfile
# VERSION 파일 : 0.0.3 수정
# server.py 파일 : 0.0.3 수정pipeline {
agent any
environment {
DOCKER_IMAGE = '<자신의 도커 허브 계정>/dev-app' // Docker 이미지 이름
}
stages {
stage('Checkout') {
steps {
git branch: 'main',
url: 'http://<자신의 집 IP>:3000/devops/dev-app.git', // Git에서 코드 체크아웃
credentialsId: 'gogs-crd' // Credentials ID
}
}
stage('Read VERSION') {
steps {
script {
// VERSION 파일 읽기
def version = readFile('VERSION').trim()
echo "Version found: ${version}"
// 환경 변수 설정
env.DOCKER_TAG = version
}
}
}
stage('Docker Build and Push') {
steps {
script {
docker.withRegistry('https://index.docker.io/v1/', 'dockerhub-crd') {
// DOCKER_TAG 사용
def appImage = docker.build("${DOCKER_IMAGE}:${DOCKER_TAG}")
appImage.push()
appImage.push("latest")
}
}
}
}
}
post {
success {
echo "Docker image ${DOCKER_IMAGE}:${DOCKER_TAG} has been built and pushed successfully!"
}
failure {
echo "Pipeline failed. Please check the logs."
}
}
}
- 업데이트 파일 git push
git add . && git commit -m "VERSION $(cat VERSION) Changed" && git push -u origin main
- Gogs webhook 기록 확인
- 도커 저장소 확인
- Jenkins 트리거 빌드 확인
- cluster에 신규 버전 적용
## 신규 이미지 업데이트
k set image deployment timeserver timeserver-container=$DHUSER/dev-app:0.0.3 && while true; do curl -s --connect-timeout 1 http://127.0.0.1:30000 ; sleep 1 ; done
Jenkins CI/CD + K8S (Kind)
Jenkins 컨테이너 내부에 툴 설치
docker compose exec --privileged -u root jenkins bash

## kubectl 설치
curl -LO "https://dl.k8s.io/release/$(curl -L -s https://dl.k8s.io/release/stable.txt)/bin/linux/arm64/kubectl"
install -o root -g root -m 0755 kubectl /usr/local/bin/kubectl
kubectl version --client=true

## helm 설치
curl https://raw.githubusercontent.com/helm/helm/main/scripts/get-helm-3 | bash
helm version
Jenkins item 생성
pipeline {
agent any
environment {
KUBECONFIG = credentials('k8s-crd')
}
stages {
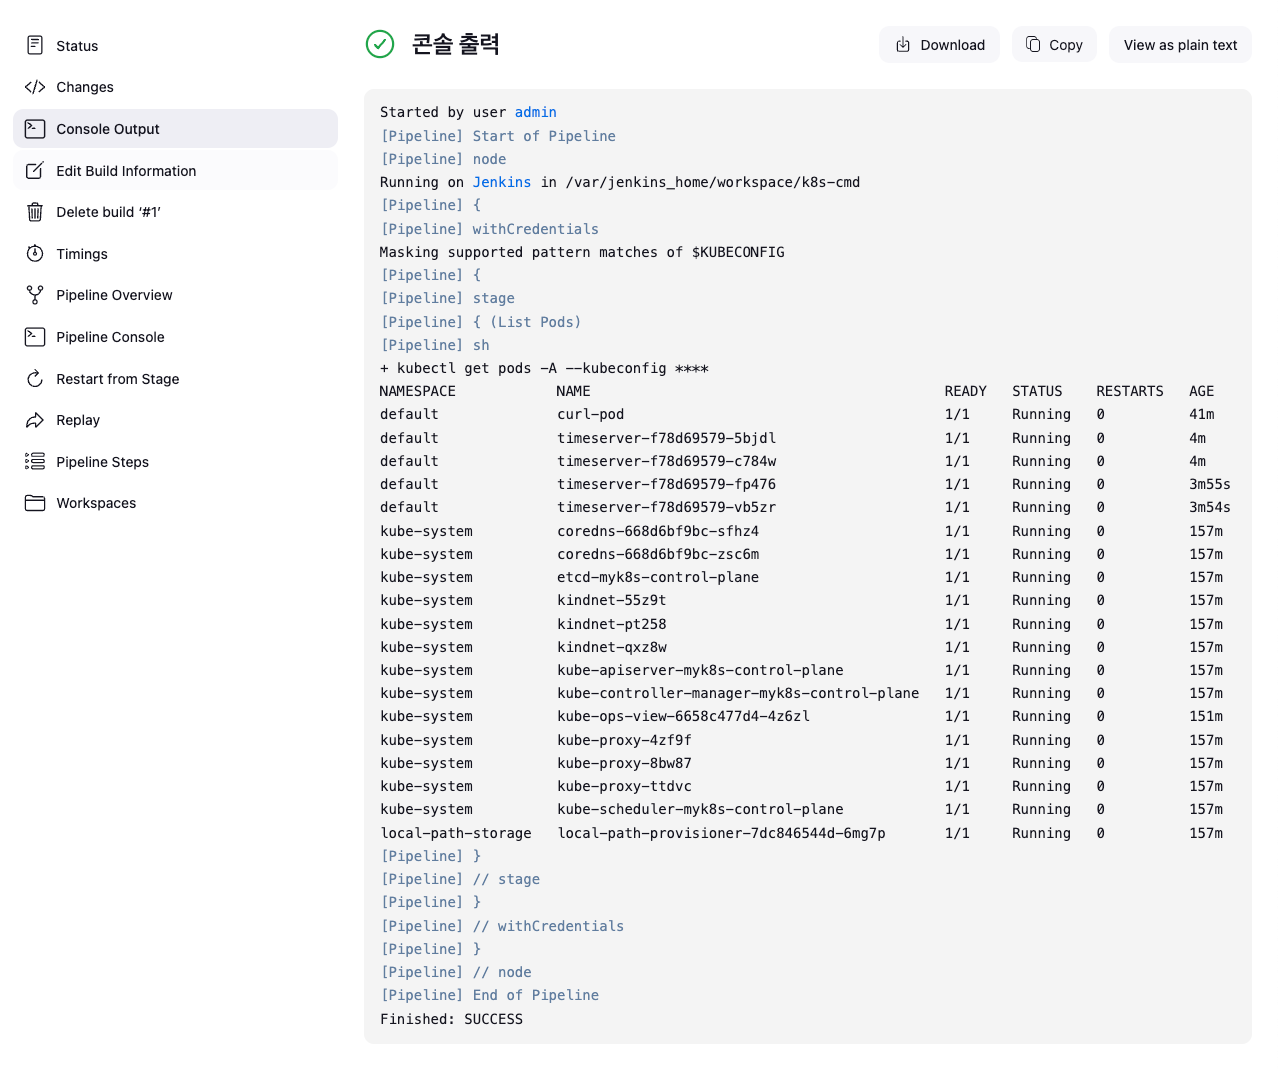
stage('List Pods') {
steps {
sh '''
# Fetch and display Pods
kubectl get pods -A --kubeconfig "$KUBECONFIG"
'''
}
}
}
}
Jenkins를 이용한 blue-green 배포
- deploy / svc yaml 파일 작성
#
cd dev-app

#
mkdir deploy

# Blue 앱 yaml 작성
cat > deploy/echo-server-blue.yaml <<EOF
apiVersion: apps/v1
kind: Deployment
metadata:
  name: echo-server-blue
spec:
  replicas: 2
  selector:
    matchLabels:
      app: echo-server
      version: blue
  template:
    metadata:
      labels:
        app: echo-server
        version: blue
    spec:
      containers:
      - name: echo-server
        image: hashicorp/http-echo
        args:
        - "-text=Hello from Blue"
        ports:
        - containerPort: 5678
EOF

# service yaml 작성
cat > deploy/echo-server-service.yaml <<EOF
apiVersion: v1
kind: Service
metadata:
  name: echo-server-service
spec:
  selector:
    app: echo-server
    version: blue
  ports:
  - protocol: TCP
    port: 80
    targetPort: 5678
    nodePort: 30000
  type: NodePort
EOF

# Green 앱 yaml 작성
cat > deploy/echo-server-green.yaml <<EOF
apiVersion: apps/v1
kind: Deployment
metadata:
  name: echo-server-green
spec:
  replicas: 2
  selector:
    matchLabels:
      app: echo-server
      version: green
  template:
    metadata:
      labels:
        app: echo-server
        version: green
    spec:
      containers:
      - name: echo-server
        image: hashicorp/http-echo
        args:
        - "-text=Hello from Green"
        ports:
        - containerPort: 5678
EOF

# git 배포

git add . && git commit -m "Add echo server yaml" && git push -u origin main
- Jenkins item 생성
## 이전 실습 자원 삭제
k delete deploy,svc timeserver

## 반복 접속 실행
while true; do curl -s --connect-timeout 1 http://127.0.0.1:30000 ; date ; echo "------------" ; sleep 1 ; done

## pipeline script 작성
pipeline {
    agent any

    environment {
        KUBECONFIG = credentials('k8s-crd')
    }

    stages {
        stage('Checkout') {
            steps {
                 git branch: 'main',
                 url: 'http://<자신의 집 IP>:3000/devops/dev-app.git',  // Git에서 코드 체크아웃
                 credentialsId: 'gogs-crd'  // Credentials ID
            }
        }

        stage('container image build') {
            steps {
                echo "container image build"
            }
        }

        stage('container image upload') {
            steps {
                echo "container image upload"
            }
        }

        stage('k8s deployment blue version') {
            steps {
                sh "kubectl apply -f ./deploy/echo-server-blue.yaml --kubeconfig $KUBECONFIG"
                sh "kubectl apply -f ./deploy/echo-server-service.yaml --kubeconfig $KUBECONFIG"
            }
        }

        stage('approve green version') {
            steps {
                input message: 'approve green version', ok: "Yes"
            }
        }

        stage('k8s deployment green version') {
            steps {
	        	sh "kubectl apply -f ./deploy/echo-server-green.yaml --kubeconfig $KUBECONFIG"
            }
        }

        stage('approve version switching') {
            steps {
                script {
                    returnValue = input message: 'Green switching?', ok: "Yes", parameters: [booleanParam(defaultValue: true, name: 'IS_SWITCHED')]
                    if (returnValue) {
                        sh "kubectl patch svc echo-server-service -p '{\"spec\": {\"selector\": {\"version\": \"green\"}}}' --kubeconfig $KUBECONFIG"
                    }
                }
            }
        }

        stage('Blue Rollback') {
            steps {
                script {
                    returnValue = input message: 'Blue Rollback?', parameters: [choice(choices: ['done', 'rollback'], name: 'IS_ROLLBACk')]
                    if (returnValue == "done") {
                        sh "kubectl delete -f ./deploy/echo-server-blue.yaml --kubeconfig $KUBECONFIG"
                    }
                    if (returnValue == "rollback") {
                        sh "kubectl patch svc echo-server-service -p '{\"spec\": {\"selector\": {\"version\": \"blue\"}}}' --kubeconfig $KUBECONFIG"
                    }
                }
            }
        }
    }
}
- 지금 빌드 후 동작 확인
- Blue가 배포된 상태에서 재배포 시 캡처와 같이 green으로 변경하겠냐는 alert 박스 표시
- yes 클릭 시 green이 배포되는 것을 확인
- 특이 사항이 없다면 Green으로 스위칭 진행
- done 클릭 : green에 특이 사항이 있어 롤백해야하는경우 rollback 선택
- 최종 배포 확인
Argo CD + K8S(kind)
Argo CD 아키텍처
GIT -> (DESIRED) ArgoCD (LIVE) => K8S
- API Server : Web UI 대시보드, k8s api 처럼 API 서버 역할
- Repository Server : Git 연결 및 배포할 yaml 생성
- Application Controller : k8s 리소스 모니터링, Git과 비교
- Redis : k8s api와 git 요청을 줄이기 위한 캐싱
- Notification : 이벤트 알림, 트리거
- Dex : 외부 인증 관리
- ApplicationSet Controller : 멀티 클러스터를 위한 App 패키징 관리
- ArgoCD 설치
## 네임스페이스 생성
k create ns argocd

## helm 배포를 위한 values 파일 생성
cat <<EOF > argocd-values.yaml
dex:
  enabled: false

server:
  service:
    type: NodePort
    nodePortHttps: 30002
  extraArgs:
    - --insecure  # HTTPS 대신 HTTP 사용
EOF

## 설치
helm repo add argo https://argoproj.github.io/argo-helm
helm install argocd argo/argo-cd --version 7.7.10 -f argocd-values.yaml --namespace argocd

## 확인
k get pod,svc,ep,secret,cm -n argocd
k get crd | grep argo
k get appproject -n argocd -o yaml

## configmap 확인
k get cm -n argocd argocd-cm -o yaml
k get cm -n argocd argocd-rbac-cm -o yaml
최초 접속 암호 확인
## 암호 확인
k -n argocd get secret argocd-initial-admin-secret -o jsonpath="{.data.password}" | base64 -d ;echo

## 웹 페이지 접속
open http://127.0.0.1:30002
- repo 등록
[settings > repository > connect repo 클릭]
아래와 같이 정보 입력 : 패스워드는 gogs token
helm chart 배포 실습 (기초)
cd cicd-labs
mkdir nginx-chart
cd nginx-chart

mkdir templates

cat > templates/configmap.yaml <<EOF
apiVersion: v1
kind: ConfigMap
metadata:
  name: {{ .Release.Name }}
data:
  index.html: |
{{ .Values.indexHtml | indent 4 }}
EOF

cat > templates/deployment.yaml <<EOF
apiVersion: apps/v1
kind: Deployment
metadata:
  name: {{ .Release.Name }}
spec:
  replicas: {{ .Values.replicaCount }}
  selector:
    matchLabels:
      app: {{ .Release.Name }}
  template:
    metadata:
      labels:
        app: {{ .Release.Name }}
    spec:
      containers:
      - name: nginx
        image: {{ .Values.image.repository }}:{{ .Values.image.tag }}
        ports:
        - containerPort: 80
        volumeMounts:
        - name: index-html
          mountPath: /usr/share/nginx/html/index.html
          subPath: index.html
      volumes:
      - name: index-html
        configMap:
          name: {{ .Release.Name }}
EOF

cat > templates/service.yaml <<EOF
apiVersion: v1
kind: Service
metadata:
  name: {{ .Release.Name }}
spec:
  selector:
    app: {{ .Release.Name }}
  ports:
  - protocol: TCP
    port: 80
    targetPort: 80
    nodePort: 30000
  type: NodePort
EOF

cat > values.yaml <<EOF
indexHtml: |
  <!DOCTYPE html>
  <html>
  <head>
    <title>Welcome to Nginx!</title>
  </head>
  <body>
    <h1>Hello, Kubernetes!</h1>
    <p>Nginx version 1.26.1</p>
  </body>
  </html>

image:
  repository: nginx
  tag: 1.26.1

replicaCount: 1
EOF

cat > Chart.yaml <<EOF
apiVersion: v2
name: nginx-chart
description: A Helm chart for deploying Nginx with custom index.html
type: application
version: 1.0.0
appVersion: "1.26.1"
EOF

## 배포
helm template dev-nginx . -f values.yaml
helm install dev-nginx . -f values.yaml
helm list
kubectl get deploy,svc,ep,cm dev-nginx -owide

## 접속 테스트
curl http://127.0.0.1:30000
curl -s http://127.0.0.1:30000 | grep version
open http://127.0.0.1:30000
## value 값 변경 후 재배포
cat > values.yaml <<EOF
indexHtml: |
  <!DOCTYPE html>
  <html>
  <head>
    <title>Welcome to Nginx!</title>
  </head>
  <body>
    <h1>Hello, Kubernetes!</h1>
    <p>Nginx version 1.26.2</p>
  </body>
  </html>

image:
  repository: nginx
  tag: 1.26.2

replicaCount: 2
EOF

## 변경된 버전으로 chart 치환
sed -i '' "s|1.26.1|1.26.2|g" Chart.yaml

## helm chart 업그레이드
helm template dev-nginx . -f values.yaml
helm upgrade dev-nginx . -f values.yaml

## 접속 확인
curl http://127.0.0.1:30000
curl http://127.0.0.1:30000 | grep version
Repo(ops-deploy) 에 nginx helm chart 를 Argo CD를 통한 배포 1
- git 작업
cd cicd-labs

git clone http://devops:$TOKEN@$MyIP:3000/devops/ops-deploy.git
cd ops-deploy

## git 설정
git --no-pager config --local --list
git config --local user.name "devops"
git config --local user.email "a@a.com"
git config --local init.defaultBranch main
git config --local credential.helper store
git --no-pager config --local --list
cat .git/config
## helm 차트 작성
VERSION=1.26.1

mkdir nginx-chart
mkdir nginx-chart/templates

cat > nginx-chart/VERSION <<EOF
$VERSION
EOF

cat > nginx-chart/templates/configmap.yaml <<EOF
apiVersion: v1
kind: ConfigMap
metadata:
  name: {{ .Release.Name }}
data:
  index.html: |
{{ .Values.indexHtml | indent 4 }}
EOF

cat > nginx-chart/templates/deployment.yaml <<EOF
apiVersion: apps/v1
kind: Deployment
metadata:
  name: {{ .Release.Name }}
spec:
  replicas: {{ .Values.replicaCount }}
  selector:
    matchLabels:
      app: {{ .Release.Name }}
  template:
    metadata:
      labels:
        app: {{ .Release.Name }}
    spec:
      containers:
      - name: nginx
        image: {{ .Values.image.repository }}:{{ .Values.image.tag }}
        ports:
        - containerPort: 80
        volumeMounts:
        - name: index-html
          mountPath: /usr/share/nginx/html/index.html
          subPath: index.html
      volumes:
      - name: index-html
        configMap:
          name: {{ .Release.Name }}
EOF

cat > nginx-chart/templates/service.yaml <<EOF
apiVersion: v1
kind: Service
metadata:
  name: {{ .Release.Name }}
spec:
  selector:
    app: {{ .Release.Name }}
  ports:
  - protocol: TCP
    port: 80
    targetPort: 80
    nodePort: 30000
  type: NodePort
EOF

cat > nginx-chart/values-dev.yaml <<EOF
indexHtml: |
  <!DOCTYPE html>
  <html>
  <head>
    <title>Welcome to Nginx!</title>
  </head>
  <body>
    <h1>Hello, Kubernetes!</h1>
    <p>DEV : Nginx version $VERSION</p>
  </body>
  </html>

image:
  repository: nginx
  tag: $VERSION

replicaCount: 1
EOF

cat > nginx-chart/values-prd.yaml <<EOF
indexHtml: |
  <!DOCTYPE html>
  <html>
  <head>
    <title>Welcome to Nginx!</title>
  </head>
  <body>
    <h1>Hello, Kubernetes!</h1>
    <p>PRD : Nginx version $VERSION</p>
  </body>
  </html>

image:
  repository: nginx
  tag: $VERSION

replicaCount: 2
EOF

cat > nginx-chart/Chart.yaml <<EOF
apiVersion: v2
name: nginx-chart
description: A Helm chart for deploying Nginx with custom index.html
type: application
version: 1.0.0
appVersion: "$VERSION"
EOF
## helm 확인 및 변수 지정
helm template dev-nginx nginx-chart -f nginx-chart/values-dev.yaml
helm template prd-nginx nginx-chart -f nginx-chart/values-prd.yaml
DEVNGINX=$(helm template dev-nginx nginx-chart -f nginx-chart/values-dev.yaml | sed 's/---//g')
PRDNGINX=$(helm template prd-nginx nginx-chart -f nginx-chart/values-prd.yaml | sed 's/---//g')
diff <(echo "$DEVNGINX") <(echo "$PRDNGINX")

## git push
git add . && git commit -m "Add nginx helm chart" && git push -u origin main- Argo CD에 app 등록 (dev)
- PRUNE : GIt에서 자원 삭제 후 배포시 K8S에서는 삭제되지 않으나, 해당 옵션을 선택하면 삭제시킴
- FORCE : --force 옵션으로 리소스 삭제
- APPLY ONLY : ArgoCD의 Pre/Post Hook은 사용 안함 (리소스만 배포)
- DRY RUN : 테스트 배포 (배포에 에러가 있는지 한번 확인해 볼때 사용)
## 배포 상태 확인
k get applications -n argocd
k describe applications -n argocd dev-nginx

## 상태 모니터링
k get applications -n argocd -w

## 반복 접속 시도
while true; do curl -s --connect-timeout 1 http://127.0.0.1:30000 ; date ; echo "------------" ; sleep 1 ; done
- argocd 포털에서 sync 하기전에 생성될 자원 확인
- Version 변경하여 배포
#
VERSION=1.26.2

cat > nginx-chart/VERSION <<EOF
$VERSION
EOF

cat > nginx-chart/values-dev.yaml <<EOF
indexHtml: |
  <!DOCTYPE html>
  <html>
  <head>
    <title>Welcome to Nginx!</title>
  </head>
  <body>
    <h1>Hello, Kubernetes!</h1>
    <p>DEV : Nginx version $VERSION</p>
  </body>
  </html>

image:
  repository: nginx
  tag: $VERSION

replicaCount: 2
EOF

cat > nginx-chart/values-prd.yaml <<EOF
indexHtml: |
  <!DOCTYPE html>
  <html>
  <head>
    <title>Welcome to Nginx!</title>
  </head>
  <body>
    <h1>Hello, Kubernetes!</h1>
    <p>PRD : Nginx version $VERSION</p>
  </body>
  </html>

image:
  repository: nginx
  tag: $VERSION

replicaCount: 2
EOF

cat > nginx-chart/Chart.yaml <<EOF
apiVersion: v2
name: nginx-chart
description: A Helm chart for deploying Nginx with custom index.html
type: application
version: 1.0.0
appVersion: "$VERSION"
EOF

#
git add . && git commit -m "Update nginx version $(cat nginx-chart/VERSION)" && git push -u origin main
- argocd 웹에서 refresh를 통해 outofsync 확인
- sync 진행 후 변경 사항 적용 확인
- 테스트 자원 삭제
Repo(ops-deploy) 에 nginx helm chart 를 Argo CD를 통한 배포 2 : ArgoCD Declarative Setup
- k8s finalizers 와 Argo Finalizers 동작
- Kubernetes에서 finalizers는 리소스의 metadata.finalizers 필드에 정의된 이름 목록으로, 리소스가 삭제 요청을 받았을 때(즉, kubectl delete나 API 호출로 삭제가 시작될 때) 바로 제거되지 않고, 지정된 작업이 완료될 때까지 "종료 중"(Terminating) 상태로 유지
- ArgoCD는 이 메커니즘을 활용해 애플리케이션 삭제 시 관리 대상 리소스의 정리(cleanup)를 제어함
- ArgoCD에서 가장 흔히 사용되는 finalizer는 resources-finalizer.argocd.argoproj.io 이 finalizer는 애플리케이션이 삭제될 때 해당 애플리케이션이 관리하는 모든 리소스(예: Pod, Service, ConfigMap 등)를 함께 삭제하도록 보장함
- ArgoCD Finalizers의 목적
1. 리소스 정리 보장: 애플리케이션 삭제 시 관련 리소스가 남지 않도록 보장함
이는 GitOps 워크플로우에서 선언적 상태를 유지하는 데 중요함
2. 의도치 않은 삭제 방지 : finalizer가 없으면 실수로 Argo App을 삭제해도 K8S 리소스가 남아 혼란이 생길 수 있습니다.
finalizer는 이를 방지함
3. App of Apps 패턴 지원: 여러 애플리케이션을 계층적으로 관리할 때, 상위 애플리케이션 삭제 시 하위 리소스까지 정리
- dev-nginx App 생성 및 Auto Sync
#
echo $MyIP

## argo app 생성
cat <<EOF | kubectl apply -f -
apiVersion: argoproj.io/v1alpha1
kind: Application
metadata:
  name: dev-nginx
  namespace: argocd
  finalizers:
  - resources-finalizer.argocd.argoproj.io
spec:
  project: default
  source:
    helm:
      valueFiles:
      - values-dev.yaml
    path: nginx-chart
    repoURL: http://$MyIP:3000/devops/ops-deploy
    targetRevision: HEAD
  syncPolicy:
    automated:
      prune: true
    syncOptions:
    - CreateNamespace=true
  destination:
    namespace: dev-nginx
    server: https://kubernetes.default.svc
EOF


# 생성 확인
kubectl get applications -n argocd dev-nginx
kubectl get applications -n argocd dev-nginx -o yaml | kubectl neat
kubectl describe applications -n argocd dev-nginx
kubectl get pod,svc,ep,cm -n dev-nginx

# 접속 테스트
curl http://127.0.0.1:30000
open http://127.0.0.1:30000

# Argo CD App 삭제
kubectl delete applications -n argocd dev-nginx- prd-nginx App 생성 및 Auto SYNC
# argo app 생성
cat <<EOF | kubectl apply -f -
apiVersion: argoproj.io/v1alpha1
kind: Application
metadata:
  name: prd-nginx
  namespace: argocd
  finalizers:
  - resources-finalizer.argocd.argoproj.io
spec:
  destination:
    namespace: prd-nginx
    server: https://kubernetes.default.svc
  project: default
  source:
    helm:
      valueFiles:
      - values-prd.yaml
    path: nginx-chart
    repoURL: http://$MyIP:3000/devops/ops-deploy
    targetRevision: HEAD
  syncPolicy:
    automated:
      prune: true
    syncOptions:
    - CreateNamespace=true
EOF

# 생성 확인
kubectl get applications -n argocd prd-nginx
kubectl describe applications -n argocd prd-nginx
kubectl get pod,svc,ep,cm -n prd-nginx

# 접속 테스트
curl http://127.0.0.1:30000
open http://127.0.0.1:30000

# Argo CD App 삭제
kubectl delete applications -n argocd prd-nginx
Repo(ops-deploy) 에 Webhook 를 통해 Argo CD 에 즉시 반영 trigger하여 k8s 배포 할 수 있게 설정
Repo(ops-deploy) 에 webhooks 설정 : Gogs 선택
- dev-nginx argocd app 생성
cat <<EOF | kubectl apply -f -
apiVersion: argoproj.io/v1alpha1
kind: Application
metadata:
  name: dev-nginx
  namespace: argocd
  finalizers:
  - resources-finalizer.argocd.argoproj.io
spec:
  project: default
  source:
    helm:
      valueFiles:
      - values-dev.yaml
    path: nginx-chart
    repoURL: http://$MyIP:3000/devops/ops-deploy
    targetRevision: HEAD
  syncPolicy:
    automated:
      prune: true
    syncOptions:
    - CreateNamespace=true
  destination:
    namespace: dev-nginx
    server: https://kubernetes.default.svc
EOF
- git 수정 후 argocd 즉시 반영 확인
#
cd cicd-labs/ops-deploy/nginx-chart

#
sed -i -e "s|replicaCount: 2|replicaCount: 3|g" values-dev.yaml
git add values-dev.yaml && git commit -m "Modify nginx-chart : values-dev.yaml" && git push -u origin main
watch -d kubectl get all -n dev-nginx -o wide

#
sed -i -e "s|replicaCount: 3|replicaCount: 4|g" values-dev.yaml
git add values-dev.yaml && git commit -m "Modify nginx-chart : values-dev.yaml" && git push -u origin main
watch -d kubectl get all -n dev-nginx -o wide

#
sed -i -e "s|replicaCount: 4|replicaCount: 2|g" values-dev.yaml
git add values-dev.yaml && git commit -m "Modify nginx-chart : values-dev.yaml" && git push -u origin main
watch -d kubectl get all -n dev-nginx -o wide
1) replica 2 -> 3
2) replica 3 -> 4
3) replica 4 -> 2
Jenkins CI + Argo CD + K8S(Kind)
- ops-deploy 기본 작업
## 경로 이동
cd ops-deploy

## 디렉토리 생성
mkdir dev-app

## 도커 계정 정보
DHUSER=<docker user>

## 버전 정보
VERISON=0.0.1

## VERSION 파일 생성
cat > dev-app/VERSION <<EOF
$VERSION
EOF

## deploy,svc 파일 생성
cat > dev-app/timeserver.yaml <<EOF
apiVersion: apps/v1
kind: Deployment
metadata:
  name: timeserver
spec:
  replicas: 2
  selector:
    matchLabels:
      pod: timeserver-pod
  template:
    metadata:
      labels:
        pod: timeserver-pod
    spec:
      containers:
      - name: timeserver-container
        image: docker.io/$DHUSER/dev-app:$VERSION
        livenessProbe:
          initialDelaySeconds: 30
          periodSeconds: 30
          httpGet:
            path: /healthz
            port: 80
            scheme: HTTP
          timeoutSeconds: 5
          failureThreshold: 3
          successThreshold: 1
    imagePullSecrests:
    - name: dockerhub-secret
EOF

cat > dev-app/service.yaml <<EOF
apiVersion: v1
kind: Service
metadata:
  name: timeserver
spec:
  selector:
    pod: timeserver-pod
  ports:
  - port: 80
    targetPort: 80
    protocol: TCP
    nodePort: 30000
  type: NodePort
EOF

## 배포
git add . && git commit -m "Add dev-app deployment yaml" && git push -u origin main
- ops-deploy를 바라보는 ArgoCD 생성
## 변수 확인
echo $MyIP

## argo app 생성
cat <<EOF | kubectl apply -f -
apiVersion: argoproj.io/v1alpha1
kind: Application
metadata:
  name: timeserver
  namespace: argocd
  finalizers:
  - resources-finalizer.argocd.argoproj.io
spec:
  project: default
  source:
    path: dev-app
    repoURL: http://$MyIP:3000/devops/ops-deploy
    targetRevision: HEAD
  syncPolicy:
    automated:
      prune: true
    syncOptions:
    - CreateNamespace=true
  destination:
    namespace: default
    server: https://kubernetes.default.svc
EOF

## 확인
k get application -n argocd timeserver
k get application -n argocd timeserver | k neat
k get deploy,rs,pod

## 접속 테스트
curl http://127.0.0.1:30000
curl http://127.0.0.1:30000/healthz
- dev-app 설정
- dev-app Repo에 VERSION 업데이트 시 → ops-deploy Repo 에 dev-app 에 파일에 버전 정보 업데이트 작업 추가
1. 기존 버전 정보는 VERSION 파일 내에 정보를 가져와서 변수 지정 : OLDVER=$(cat dev-app/VERSION)
2. 신규 버전 정보는 environment 도커 태그 정보를 가져와서 변수 지정 : NEWVER=$(echo ${DOCKER_TAG})
3. 이후 sed 로 ops-deploy Repo 에 dev-app/VERSION, timeserver.yaml 2개 파일에 ‘기존 버전’
→ ‘신규 버전’으로 값 변경
4. 이후 ops-deploy Repo 에 git push ⇒ Argo CD App Trigger 후 AutoSync 로 신규 버전 업데이트 진행 - Jenkinsfilt 수정 (SCM-Pipeline)
pipeline {
    agent any
    environment {
        DOCKER_IMAGE = '<자신의 도커 허브 계정>/dev-app' // Docker 이미지 이름
        GOGSCRD = credentials('gogs-crd')
    }
    stages {
        stage('dev-app Checkout') {
            steps {
                 git branch: 'main',
                 url: 'http://<자신의 집 IP>:3000/devops/dev-app.git',  // Git에서 코드 체크아웃
                 credentialsId: 'gogs-crd'  // Credentials ID
            }
        }
        stage('Read VERSION') {
            steps {
                script {
                    // VERSION 파일 읽기
                    def version = readFile('VERSION').trim()
                    echo "Version found: ${version}"
                    // 환경 변수 설정
                    env.DOCKER_TAG = version
                }
            }
        }
        stage('Docker Build and Push') {
            steps {
                script {
                    docker.withRegistry('https://index.docker.io/v1/', 'dockerhub-crd') {
                        // DOCKER_TAG 사용
                        def appImage = docker.build("${DOCKER_IMAGE}:${DOCKER_TAG}")
                        appImage.push()
                        appImage.push("latest")
                    }
                }
            }
        }
        stage('ops-deploy Checkout') {
            steps {
                 git branch: 'main',
                 url: 'http://<자신의 집 IP>:3000/devops/ops-deploy.git',  // Git에서 코드 체크아웃
                 credentialsId: 'gogs-crd'  // Credentials ID
            }
        }
        stage('ops-deploy version update push') {
            steps {
                sh '''
                OLDVER=$(cat dev-app/VERSION)
                NEWVER=$(echo ${DOCKER_TAG})
                sed -i "s/$OLDVER/$NEWVER/" dev-app/timeserver.yaml
                sed -i "s/$OLDVER/$NEWVER/" dev-app/VERSION
                git add ./dev-app
                git config user.name "devops"
                git config user.email "a@a.com"
                git commit -m "version update ${DOCKER_TAG}"
                git push http://${GOGSCRD_USR}:${GOGSCRD_PSW}@<자신의 집 IP>:3000/devops/ops-deploy.git
                '''
            }
        }
    }
    post {
        success {
            echo "Docker image ${DOCKER_IMAGE}:${DOCKER_TAG} has been built and pushed successfully!"
        }
        failure {
            echo "Pipeline failed. Please check the logs."
        }
    }
}- dev-app 에서 git push 수행
## 반복 동작 확인
while true; do curl -s --connect-timeout 1 http://127.0.0.1:30000 ; echo ; kubectl get deploy timeserver -owide; echo "------------" ; sleep 1 ; done

# VERSION 파일 수정 : 0.0.5
# server.py 파일 수정 : 0.0.5

git add . && git commit -m "VERSION $(cat VERSION) Changed" && git push -u origin main
Argo Rollout
CRD를 통해 Kubernetes에 Blue-Green, Canary, 잗동 롤백/승력, 트래픽 분산을 추가
장점
- 기존 rollingupdate의 한계 해결
- 트래픽 흐름 제어
- 외부 메트릭 기반 검증
- 자동 롤백
- 출시 속도 조절
기능
- Blue-Green, Canary 배포 전략
- 가중치 기반 트래픽 전환
- 자동 롤백 및 승격
- 사용자 정의 메트릭 분석 및 외부 모니터링 도구와 통합
- Ingress Controller 및 Service Mesh 통합 (NGINX, ALB, Istio 등)
Argo Rollout 설치
# 네임스페이스 생성 및 파라미터 파일 작성
cd cicd-labs

kubectl create ns argo-rollouts
cat <<EOT > argorollouts-values.yaml
dashboard:
  enabled: true
  service:
    type: NodePort
    nodePort: 30003
EOT

# 설치: 2.35.1
helm install argo-rollouts argo/argo-rollouts --version 2.39.2 -f argorollouts-values.yaml --namespace argo-rollouts

# 확인
kubectl get all -n argo-rollouts
kubectl get crds

# 접속
open "http://127.0.0.1:30003"
# 다음 명령을 실행하여 초기 롤아웃 및 서비스를 배포합니다:
kubectl apply -f https://raw.githubusercontent.com/argoproj/argo-rollouts/master/docs/getting-started/basic/rollout.yaml
kubectl apply -f https://raw.githubusercontent.com/argoproj/argo-rollouts/master/docs/getting-started/basic/service.yaml

# 확인
kubectl get rollout --watch
kubectl get rollout
kubectl describe rollout

kubectl get pod -l app=rollouts-demo
kubectl get svc,ep rollouts-demo
kubectl get rollouts rollouts-demo -o json | grep rollouts-demo
...
   "image": "argoproj/rollouts-demo:blue"
...
- update rollout
kubectl edit rollouts rollouts-demo

## 이미지를 blue에서 yellow로 변경
- image: argoproj/rollouts-demo:blue >> - image: argoproj/rollouts-demo:yellow- Promoting a Rollout
promote 명령을 실행하여 yellow 이미지의 서비스를 운영으로 승격
아래 youtube와 같이 테스트 페이지를 통해 트래픽이 blue > green으로 변경되는 것을 시각적으로 확인도 가능합니다.
'Cloud > Kubernetes' 카테고리의 다른 글
| [KANS] AWS EKS : VPC CNI (4) | 2024.11.03 |
|---|---|
| [KANS] Cilium + eBPF (2) (2) | 2024.10.27 |
| [KANS] Cilium & Hubble (0) | 2024.10.26 |
| [KANS] Istio - Traffic Management (0) | 2024.10.20 |
| [KANS] Istio example (bookinfo) (1) | 2024.10.20 |